Apem Panggang-Rice Flour Pancake with Grated Coconut Topping-Javanese Style

Tuesday, November 29, 2011


Apem Panggang

"Apem" is a traditional snack which originally served during some ceremony at Javanese palaces in Yogyakarta and Surakarta. At later days this snack is also prepared among Javanese household to celebrate some important dates such as celebration of births, Ied Mubarak, 100days of grief, etc.
I love the taste of this snack since it is a combination of sweetness, slightly sour (from the fermentation) of the cake and saltiness of the topping.

This time, I would love to share this with other Indonesian food blogger for the IDFB#2-Challenge.


Recipe source is here

Ingredients:
250g rice flour
100g granulated white sugar
1 tsp instant yeast
1/2 tsp baking powder
200ml thick coconut milk
300ml coconut juice
3/4 tsp salt
200g grated coconut meat (salted)

Directions:
In a bowl, mix well together all of the ingredients except grated coconut meat. Cover the bowl with a plastic wrap and leave it for 30min in a warm place. Preheat the moulding pan and grease with some margarine. Pour the batter, put the lid on and cook at medium-low heat until raising up, pores formed and well cooked. Remove from the moulding pan and serve it with some salted grated coconut meat on top.


Black and White Wednesday - Week#18 - The Soda Shoppe

Wednesday, November 9, 2011

Cafe


Yayyy..finally I am able to join the BWW again, after skipping for 3 weeks. I was away for vacation for the first 2 weeks, and last week it was too hectic to post something. Here is a picture I took during our vacation in British Columbia, Canada. It was a very nice little cafe at downtown Victoria, called the Soda Shoppe.
Enjoy the picture and to join the fun please follow this link. Happy midweek!

Rainbow Swirl Frosting - Tutorial

Thursday, November 3, 2011

Rainbow Swirl cupcake

One day, I just did not feel like decorating my cupcakes with fondant, so why not trying some buttercream. But the thing is, I am too clumsy to work with buttercream..to be honest. My hand is not steady enough to create a neat line nor curve. Then I saw some pictures on the internet, cupcakes with colorful rainbow swirls. Having a chit-chatting with some baking friends through my blackberry group, I found a useful tutorial on how to make it here. So I tried it myself for a set of Spidey cupcakes, and I was so happy with the result.

Spider-man Cake

Since then I have been using this decorating method for some cupcakes set for friends birthdays or just for fun at home. And I decided to take some pictures while doing it as I have promised to some of you that I will post a tutorial on how to do rainbow swirl frosting decoration. The original post from my friend is in Bahasa Indonesia, so I thought it would be nice to have one in English thus readers with no Bahasa Indonesia knowledge still be able to understand. Let's get started!

Rainbow Swirl Icing in the making

Step 1: you need to have 3 different color of buttercream. I was using 3 primary color here. Mix well the food coloring with the buttercream in separate bowl.

Rainbow Swirl Icing in the making

Step 2: Put it inside the decorating bag, each for every color, so you will have 3 bags.

Rainbow Swirl Icing in the making

Step 3: Take another empty decorating bag and alternately fill it up (half-full) with the 3 color buttercream, as shown on the above picture.

Decorating tip

Step 4: Choose a decorating tip as you prefer.

Rainbow Swirl Icing in the making

Step 5: Take another empty decorating bag and place the tip on top of it. Then place the bag with 3colored-buttercream inside it (so it's gonna be double bag). Now you are ready to decorate your cupcakes.
Since I could not take pictures while decorating it and no one's there to help me taking pictures, I would like to share a video I found on Youtube. This video will show you how to do the rose swirl.


Step 6: Decorating the cake using rose swirl method as shown on the above video (the movement started from the centre and goes out, while the classic swirl goes the other way around).
You may add some decorations like: sprinkles, silver beads, fruits, etc.

Rainbow Swirl Cupcake

Black and White Wednesday - Week#14 - Bread Fruit

Wednesday, October 12, 2011

Sukun (Bread-fruit)

There is a particular fresh produce store here in Edmonton, called H&W produce which I really wanted to visit since 2 months ago. However, it did not happen soon...not until 3 weeks ago. Thus, I came for a short visit and instantly in love with this store..The prices are incredibly low compared to other stores. They sell various fresh and some exotic products too. On the first visit I saw this breadfruit and I recognized it as "Sukun" the name I knew back then in my hometown, but decided not to buy it, since I was not familiar with the English name and not sure whether it is the same thing as Sukun. I came home and started googling for this name and found out yes it is! I made another visit, unfortunately they were sold out. Eventually, on my third visit, I was able to buy one. It is a little bit pricey (of course..it is an exotic product and can not be found easily), 3.49$/Lb..but still I wanted to buy it since I had not had it for almost 6years.
I want to share this picture for Black and White Wednesday, a weekly culinary photo event. And in case you are wondering how the inside look like, here is another picture of a slice of the breadfruit. Stay tune if you wanna know how I cook this, I will post the recipe soon.

Sukun (Bread-fruit)

Black and White Wednesday - Week#13 - Eating Under This Beauty

Wednesday, October 5, 2011

Beautiful Mozaic

Whenever we dine in a restaurant, I always make time to explore the interior design. The painting, flowers, and lights. So I took this picture last year when we dined in at the Old Spaghetti Factory, here in Edmonton. I love this specific mozaic pattern on the light cover, and want to share this beauty to the Black and White Wednesday, a weekly photography event. What a wonderful time we had while eating under this beauty.

Rose Fondant - Tutorial

Monday, October 3, 2011

Rose cupcake

The other day I made a set of rose cupcakes for my dear friend's birthday and have promised to my readers that I will post a tutorial on how to make the rose fondant. To keep that promise, here is a simple step by step on how to prepare rose and leaf fondant.

What you need:
Some rolled fondant, colored as prefer
Sharp knife
A ziploc
Veining tool

Rose1

1: roll a long cylinder as shown on the picture
2: make 4 same size cuts
3: roll the first three into round balls and the last one into a cylinder

Rose2

4: place them inside a ziploc.
5: flatten each of them using your thumb.
6: Take out the cylinder one and roll it from one side.

Rose3

7: continue to roll to the other side
8: The result will look like "stigma"
9: Take one of the flatten round shape, and wrap around the "stigma".

Rose4

10: Take the second flatten round shape and place it overlap to the first one.
11: Do the same thing as for the last round shape.
12: Cut off the unwanted bottom part.

Rose5

And here is the result....

leaves

Now to make the leaf.
1: Make round shape of green colored fondant, then rolled it on palm of hand to form an oval.
2: Flatten the oval, make adjustment of the leaf shape using your finger as needed. Then mark the long centre part using veining tool.
3: Mark the margin with veining tool as shown on the picture.

Leaves

Here is a complete picture of the process of making the leaf.
Simple isn't it? Now is your turn to try...Keep practicing!

Pecel Lele (Deep Fried Cat Fish with Chili Paste) - IDFB Challenge #1

Thursday, September 29, 2011


Sambal u/ Pecel Lele

I have joined a group called Indonesian Foodblogger on Facebook, and every two months they have a challenge that every member can participate and there are prizes to win too! For the very first challenge, they present "Food by Its Country", and here is my entry..


This food reminds me much of my university life in Yogyakarta, where a lot of food hawkers sell this menu around Gadjah Mada University campus. And for sure, this was my favorite menu as a student before and yet today. Here is my version:

Ingredients:
- frozen cat fish, cut or whole, cleaned (available at Asian stores)
- 4 cloves of garlic, crushed
- 1Tbsp of ground coriander
- salt
- water
- oil for frying

To make sambal/chili paste:
- 4 cloves of garlic
- 4 cloves of shallot
- 1 big red chilly
- 12 chili paddy
- 1 tomato
- 1tsp of shrimp paste, toasted
- 1Tbsp of palm sugar
- salt
- kaffir lime (jeruk limau)
- used frying oil (the remaining after frying the fish)

Bahan2 Sambal

Directions:
Since I normally bought the fish which was cleaned, I do not need to clean it myself. Make some slits on the side of the body. Mix crushed garlic, coriander, salt and water to marinate the fish in a container. Then marinate the fish in it for at least 30min. Deep fry it in hot oil under medium high heat until brown and crunchy. Drain off the excessed oil with paper towel.
To make chili paste: fry garlic, shallot, chili and tomato for 2-3minutes. Then transfer it into a grinder, I like to use "cobek" (traditional stone grinder). Add shrimp paste, salt and palm sugar and then grind until coarse smooth. Sprinkle some kaffir lime juice over.
Serve with warm steamed rice and some fresh veggies (lettuce, cucumber, cabbage, tomato, long beans, etc). You may add some sweet soy sauce into the chili paste to reduce the spiciness.


Black and White Wednesday - Week#12 - How hot can you go?

Wednesday, September 28, 2011

Tabasco


As some of you may know, my husband love to eat spicy/hot food. So I always have chili paste at home. When dine out he does not forget to ask for some hot sauce. This was one of them..and for him the spiciness is nothing, he emptied the first bottle right away after the waitress handed it to him. Sharing this beauty to BWW event. Check this out to join the fun.

Rose Green Tea Cupcakes

Monday, September 26, 2011

Rose Cupcakes

Lately, I prefer to cook or bake something for my friend's birthday or special event, rather than buying gift. Not that it is cheaper, it can be more costly, I feel that my hard work represents my love and caring for them. Just couple days before Jordan's birthday, my dear girlfriend had a birthday too. Thus I decided to bake some cupcakes for her. Since she is not a big fan of sweet, I prepared green tea flavored ones.
So the base is green tea cupcake, I was using the famous Hummingbird Red Velvet Cupcakes recipe and modify it with the addition of green tea and a drop of green food coloring, instead of cocoa and red food coloring.

Rose cupcakes

Ingredients for cupcakes:
60g unsalted butter, at room temperature
150g caster sugar (reduced to 125g)
1 egg
10g green tea powder
1 drop of green food coloring
1/2 tsp vanilla extract
120ml buttermilk
150g all purpose flour
1/2 tsp salt
1/2 tsp bicarbonate of soda
1.5 tsp white wine vinegar (I used regular vinegar)

For decoration:
1/2cup ready to use vanilla whipped cream
rolled fondant and gel food coloring
edible silver beads

Rose cupcakes

Directions:
Preheat the oven to 325F. Beat the butter and sugar on medium speed until light and fluffy. Speed up the mixer and add the egg. Continue to beat until it is well incorporated. In a separate bowl, mix well green tea powder, green food coloring and vanilla extract to make a thick paste. Add this to the butter mixture and mix well. Scrape down the side of the bowl. Lower the speed and slowly add half of the buttermilk. Mix well, then add half of the flour. Mix well until it is incorporated. Repeat this process until all the buttermilk and flour are added. Scrape down the side of the bowl again. Turn up to the high speed and beat until smooth and even. Lower the speed and add salt, bicarbonate of soda and vinegar. Beat it again until well mixed, then turn up the speed again and beat for a couple more minutes. Spoon the mixture into the cupcake pan until two-thirds full and bake for 20-25mins. Cool them off.
Spread the ready-to-use vanilla whipped cream and let them sit on the counter for an hour or so until it is set. Continue to decorate using fondant and silver beads.

IMG_0936

Since I got some cupcakes left, I packed two of them and gave them to Bianca's teachers.
Tutorials on how to make the rose and leave will be posted soon.

Rabbit Theme Bento - My Very First Bento

Sunday, September 25, 2011

Bento Day#1

I've promised myself long before that when my kids go to school, I will make them bento-s. So as Bianca started her school 2 weeks ago, I started to prepare bento for her. And since she is only at school for 3hours, I only get to prepare snack box for her.
This was my very first bento. As you can guess, it consists of "rabbit" hard boiled egg with nori eyes, nose and mouth; oyster sauce glazed steamed broccoli, baby carrot and "flower" cheddar cheese. I was using Hello Kitty round snack container and rainbow plastic baran.

Rabbit egg mould

Here is the picture of the egg mould.

Puppy Theme Birthday Cake

Saturday, September 24, 2011

Puppy theme Cake

I made this cute cake last month for my friend's daughter's birthday. This post mainly shares pictures of the cake and some useful links to make the fondant puppy. Sorry as no recipe will be shared. The base is chocolate sponge cake and all the decoration made out of fondant (except for the ribbon). I decided to prepare 4 different kinds of puppy.

puppy1

Top left: I made this using a toy model (Bianca has Barbie doll carrying this puppy - Barbie A Fashion fairy tale).
Top right: Please follow this and this link for tutorial on how to make this puppy.
Bottom left: I had posted a tutorial on how to make it here. Originally I saw a picture with this puppy here and from there using my imagination to create this poodle puppy.
Bottom right: I made this puppy with the help of tutorial/pictures on flickr, somehow I could not find the link. Will be updated as soon as I found it.

puppy2

Those are pictures of how they look after I placed them on the cake. I also placed a bowl and 2 bones in the middle of the cake.

puppy3

The side of the cake was decorated with some paw prints, the birthday girl's name, a heart with the number of the age. Not to forget the ribbon to sweeten the cake.

Laksa Ayam (Chicken Laksa)

Friday, September 23, 2011

Laksa Ayam


It has been a while I have not posted any meal recipes, seems like I am shifting to snack and cake decorating all these while. Nah..I still cooking as I have to feed my family (in case you're wondering). So today I decided to share a meal recipe for you. This soup is good to serve during cold days, as we are approaching autumn.

Ingredients:
4 whole chicken legs
1.5L water
1 stalk of lemongrass, cut into 4, bruised
4cm of galanga, bruised
3 kaffir lime leaves
1 Tbsp chicken broth powder
1 can of coconut milk
oil for sauteing

To crush into puree:
8 cloves of shallot
6 cloves of garlic
6 candlenuts, grilled
1 tsp dried small shrimp (ebi)
1.5 tsp coriander
1 tsp white pepper
3cm of turmeric or 1tsp of ground turmeric
3cm of ginger
salt
granulated sugar

Side dishes:
Vermicelli, boiled and drained
Bean sprout, boiled and drained
Shrimp, salted, half-boiled
Fried shallot and garlic
Egg, boiled (optional)

Laksa Ayam

Directions:
Boil chicken for 30min. Saute the spice puree, lemongrass, lime leaves, galanga with oil until fragrant. Then add this to the pot with the boiled chicken in it. Continue to cook for another 15min. Take out and drain off the chicken, then shred the meat. Keep it aside. Add the coconut milk and chicken broth powder into the broth left in the pot. Re-boil and adjust the taste. Serve it in a bowl together with the side dishes.

Black and White Wednesday - Week#11 - Rose Cupcake

Wednesday, September 21, 2011

Rose cupcake

Here is my submission for BWW event this week (week#11). Don't you think black and white can show the beauty too? Please do check this out to join the fun!

Poodle Puppy Fondant - Tutorial

Thursday, September 15, 2011

Puppy theme Cake

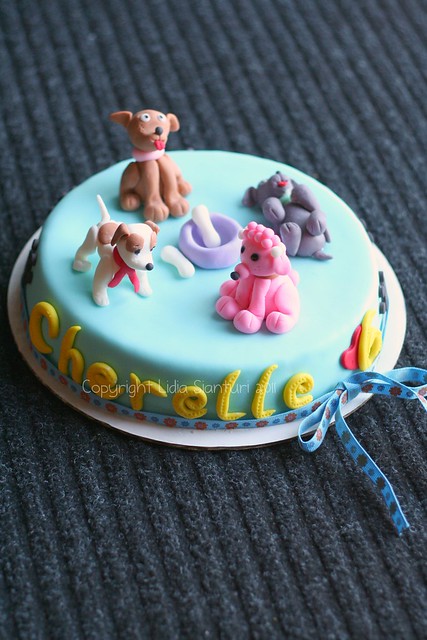
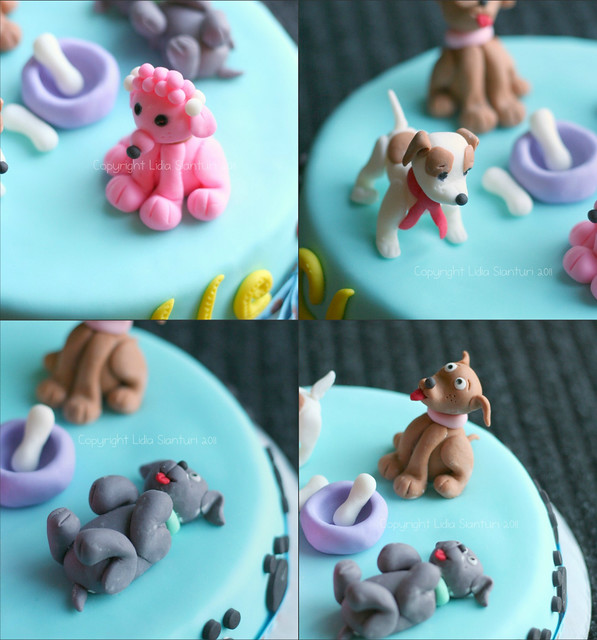
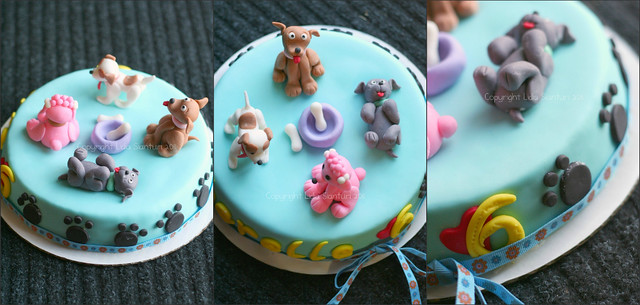
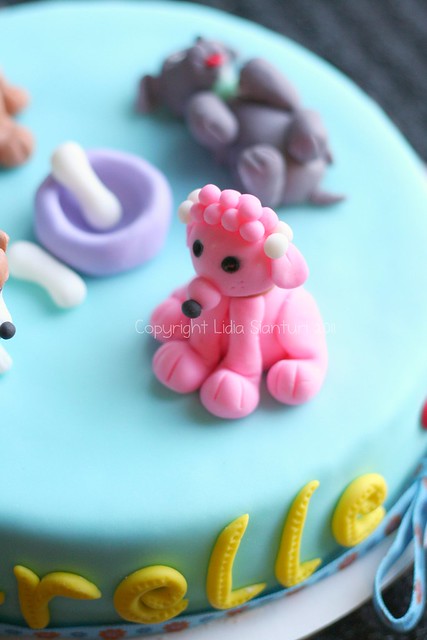
So yes the other day I wanted to make a birthday cake for a sweet little girl. Since she loves puppies, I decided to make a puppy theme cake. I browsed around and found some cute pictures of puppy fondant. My eyes fixed on this cute poodle puppy and convinced myself that I could make it. While making it, I also took some picture and now I wanna share the step by step of making it. Hope it is useful.

Let's get started!
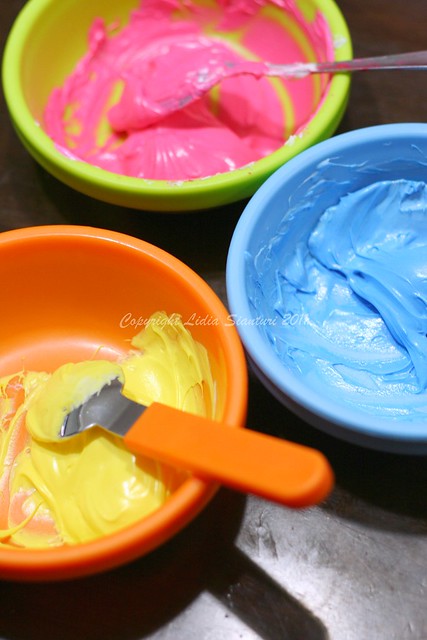
First, pick a color you like and mix it well to your white fondant. I chose pink, since my Bianca loves pink.

puppy1

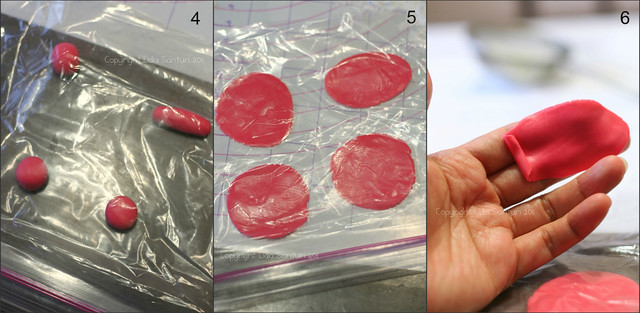
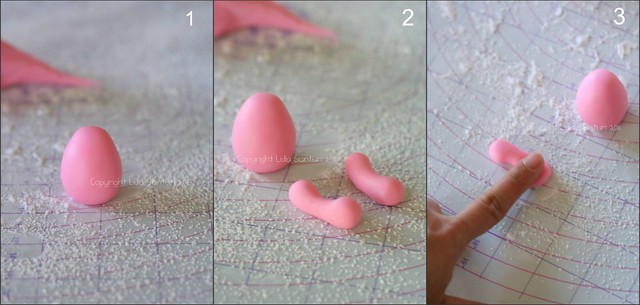
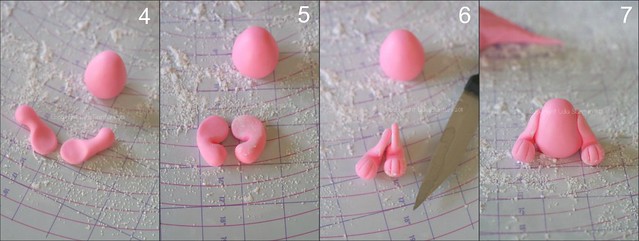
1. Make an egg shape as shown on the picture and let it stand on the table.
2. Make 2 bone shapes for feet, it is easier to make cylinder shapes first than roll the middle part using your point finger on your other palm hand (place the cylinder shape on your left palm hand and roll the middle part using your right point finger or vice versa).
3. Flatten one side of the bone

puppy2

4. Do it for both bones
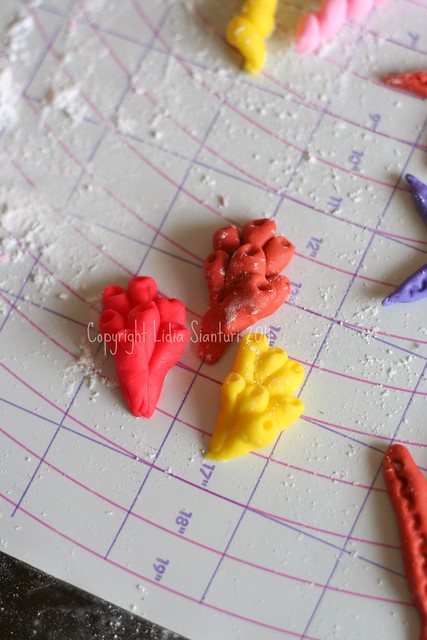
5. Bend it a little bit, as shown on the picture
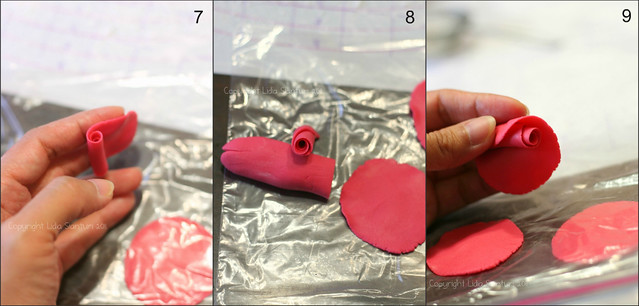
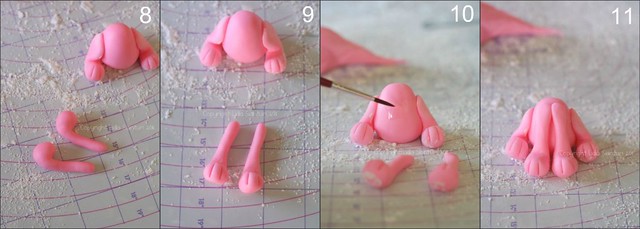
6. Slit 2 lines with a knife on the non-flatten part (for toes)
7. Glue the flatten part on the side of the egg body using some water

puppy3

8. Make another two legs as shown on the picture. You may prepare two cylinder then roll the 3/4 part of it to form a smaller rod while leaving a bigger portion on one side.
9. Slit 2 lines using knife (the same as what we did on number 6)
10. Wet the front part of the body with water
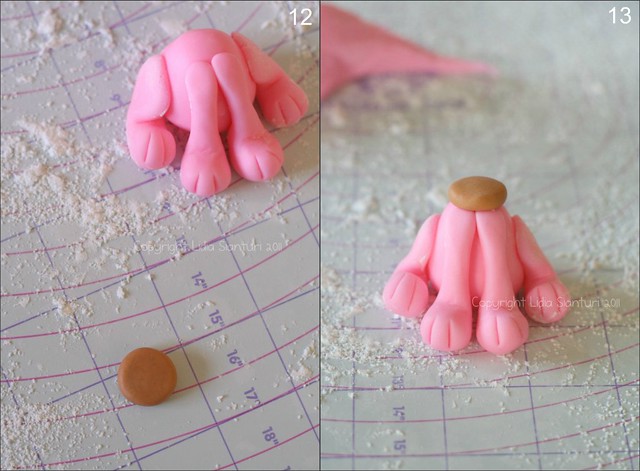
11. Stick on the two feet

puppy4

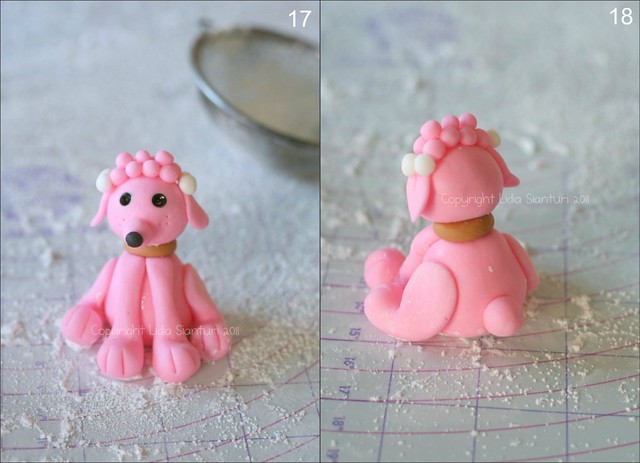
12. Make a round flat shape using other color for collar, I used brown
13. Glue it on top of the egg body

Poodle dog in the making

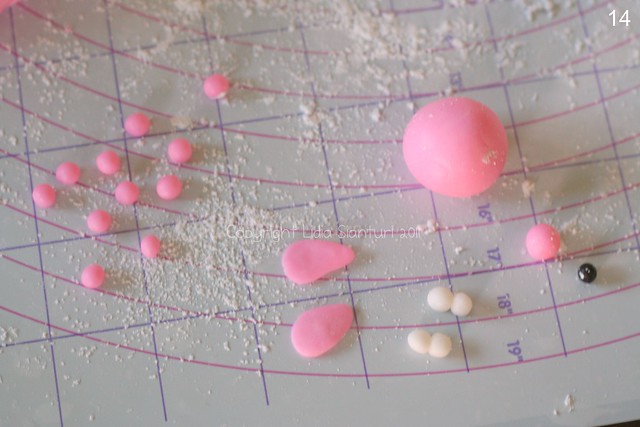
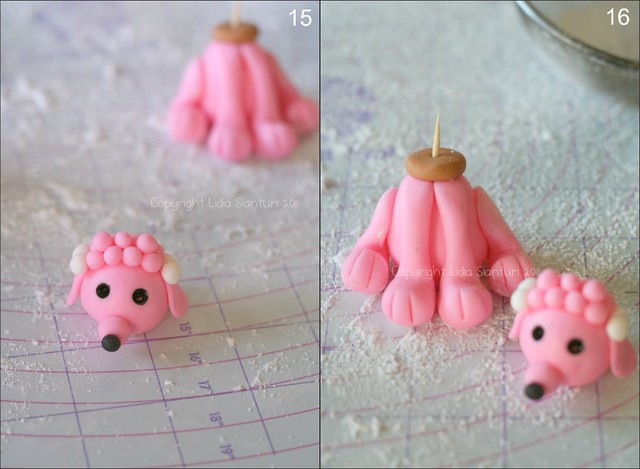
14. Make 11 small pink balls, 2 flat teardrops shapes for ears, one big pink ball (for head), 4 small white balls (stick two of them together) for hairpins, one pink ball (bigger than the 11 small pink balls) for nose, and one very small black ball for nose tip.

puppy5

15. Arrange the head as shown on the picture. First, stick two rows of 4 pink balls on top of the head (8balls). Then stick another 3 balls on top of those two rows. And then glue the flat teardrop shapes and top it of with the two double white balls/hairpins. Stick on the pink ball for nose and black ball for nose tip. Draw two big dots using edible black coloring pen for eyes (you may punch 2 holes on the eyes position using the round back of small painting brush, then color it).
16. Stick in a tooth pick in the centre of the neck.

puppy7

17. Glue the head on top of the body with the help of the tooth pick and some water
18. Make a pink ball and stick it on the lower back of the body for tail

Dry it up on an open counter overnightly. Done. Easy right? Now it is your turn to create this cute poodle puppy. Happy fondant-ing!

Black and White Wednesday - Week#10 - Es Campur

Wednesday, September 14, 2011

BWW #10


Remembering that we did have some hot days during summer this year, I decided to share what we normally had to cool off on those sweating days. Es campur is Indonesian style of fruits mixed dessert topped with shaved ice, some syrup and sweet condensed milk. This picture is shared to Black and White Wednesday (week#10) photo event. Please check this out to joint this event.

Black and White Wednesday - Week#9 - Kue Sago Keju/Cheese Sago Shortbread

Wednesday, September 7, 2011

Hellowww there...it is Wednesday again, and you know what it means...yup, Black and White Wednesday event and we are on week#9. This time, I am not gonna share the recipe, just wanna participate with a picture. To join this event please check this out.

Kue Sagu Keju

This cookie is well known in Indonesia, and is usually served during Ied Mubarak celebration. I prepared this two weeks ago to honor my moslem friends who celebrate that big day after the whole month of fasting. The black and white mode fits perfectly to the vintage can container, don't you think?

Under the Sea Theme Cake Decoration - Tutorial

Monday, September 5, 2011

Bianca's birthday cake

I have promised to some of my beloved readers, that I will post a simple tutorial for a particular birthday cake which I prepared for Bianca's birthday last April. You may see the post about this cake here.
Since it is an "Under the Sea" theme, I had to fill the surface with sea creatures. I browsed around and found useful tutorial here and here. Others were just made using my imagination.

ganache covered collage

I will start with how to cover the cake with rolled fondant. I made two round shapes of choco "lapis surabaya" cakes (9 and 6 inches). Then spread some chocolate ganache on top and side of the cooled cakes and let them sit until set. You may prepare the cake a day before.

covering cake collage

Then you may color the rolled fondant with the desired color. For this cake, I used mixed of blue and yellow gel coloring until I got the color I like. Flatten the colored fondant using rolling pin on powder sugar dusted surface. Keep rolling until the desired thickness (not too thin, so it would not tear during covering, app. 4-5mm). During rolling, lift up the fondant once awhile to avoid sticking on the table. Put the rolling pin in the middle and lift up the fondant unto it. Transfer the fondant immediately on top of the cake. Smoothen the to surface and then the side using the easy glide smoother. Trim off the excess fondant using sharp knife. For complete photo tutorial, check this out.

Sea Creatures

Now move on to the decoration, the above picture is all of the sea creatures I put on the cake.

Sea shells

Here is some cockle sea shells.

sea shells collage

Start with flatten up some colored fondant, and cut out a triangle/wedge with a little curve on the bottom. Then using a knife, make some lines/grits as shown on the second picture (but do not cut it). Pinch the narrow end and fold it in or tuck it under the shell (as shown on picture no. 3 and 4). You may put some balled up wax paper or plastic to help keeping the shells curvy while drying up.

Sea serpent

Next some sea serpents.

sea serpent collage

Make 1 little ball and 5 long skinny snakes as shown on the first picture. Use your palm hands to roll it skinnier. Arrange it as shown on the second picture. Flatten up the center ball.

Sea shells

Other simple sea shells. The worm sea shells can be made by coiling a snake long shape of fondant and pulling the coil gently (see the above picture - yellow and pink worm sea shells).

sea shells2 collage

For simple sea shells, make a tadpole shape as shown on the first picture, and then curl in the smaller end and glue it on the big end using a little amount of water (as shown on picture no.2).

Sea Creatures

To make some seaweed, you just need 3 long skinny snakes and put one ends together. Then trace a line in the middle of each leaf using fondant embosser (see the above picture) to give a unique pattern. Sorry I did not take a step by step pictures for this.

Star fish

Some starfish can be made by putting together 5 arms and trace a line with the embosser just as I did with the seaweeds. (No step by step pictures available, sorry).

Coral Reef

The last one, I made some coral reef by putting together 7 short pipes (just at one end), and squeezed them to give smaller shape on that end. Then make a hole on each pipes using toothpicks. No step by step pictures for this either.
Arrange the sea creatures on the cakes and stick them on using some water. To make sand, please read this post.
Well, that's it..Hopefully readers can understand my simple explanation. Please contact me for further questions on this simple tutorial. Happy decorating!

Bianca's and Jordan's Mom Copyright © 2009 Designed by Ipietoon Blogger Template for Bie Blogger Template Vector by DaPino