Showing posts with label cake decorating. Show all posts

Rainbow Swirl Frosting - Tutorial

Thursday, November 3, 2011

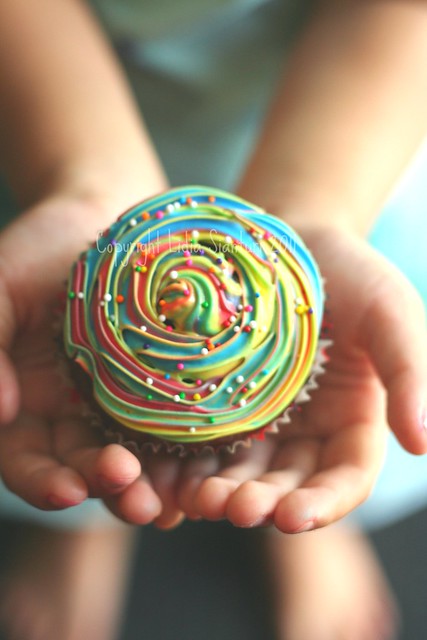
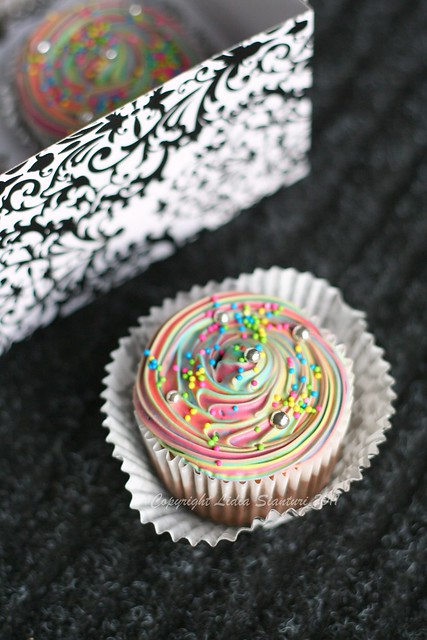
Rainbow Swirl cupcake

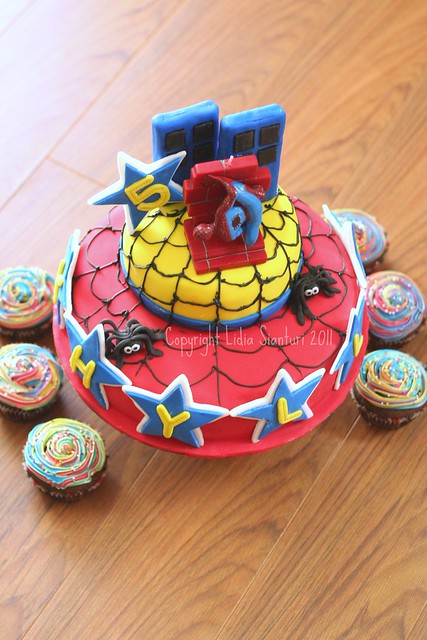
One day, I just did not feel like decorating my cupcakes with fondant, so why not trying some buttercream. But the thing is, I am too clumsy to work with buttercream..to be honest. My hand is not steady enough to create a neat line nor curve. Then I saw some pictures on the internet, cupcakes with colorful rainbow swirls. Having a chit-chatting with some baking friends through my blackberry group, I found a useful tutorial on how to make it here. So I tried it myself for a set of Spidey cupcakes, and I was so happy with the result.

Spider-man Cake

Since then I have been using this decorating method for some cupcakes set for friends birthdays or just for fun at home. And I decided to take some pictures while doing it as I have promised to some of you that I will post a tutorial on how to do rainbow swirl frosting decoration. The original post from my friend is in Bahasa Indonesia, so I thought it would be nice to have one in English thus readers with no Bahasa Indonesia knowledge still be able to understand. Let's get started!

Rainbow Swirl Icing in the making

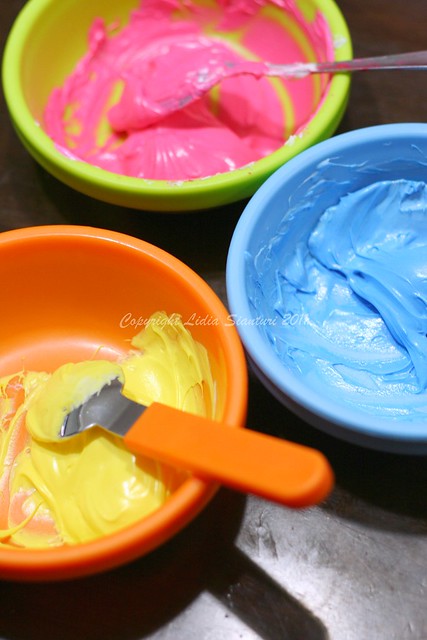
Step 1: you need to have 3 different color of buttercream. I was using 3 primary color here. Mix well the food coloring with the buttercream in separate bowl.

Rainbow Swirl Icing in the making

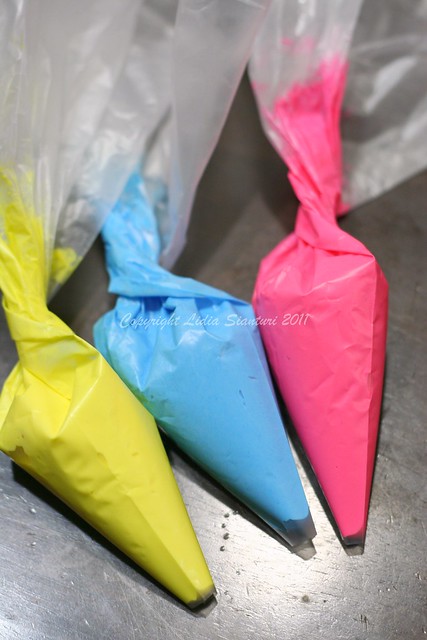
Step 2: Put it inside the decorating bag, each for every color, so you will have 3 bags.

Rainbow Swirl Icing in the making

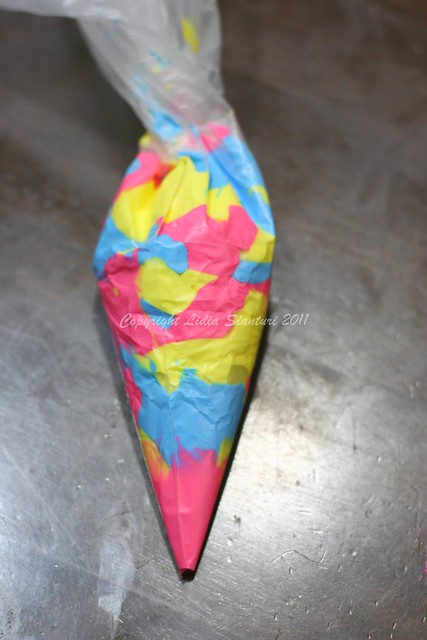
Step 3: Take another empty decorating bag and alternately fill it up (half-full) with the 3 color buttercream, as shown on the above picture.

Decorating tip

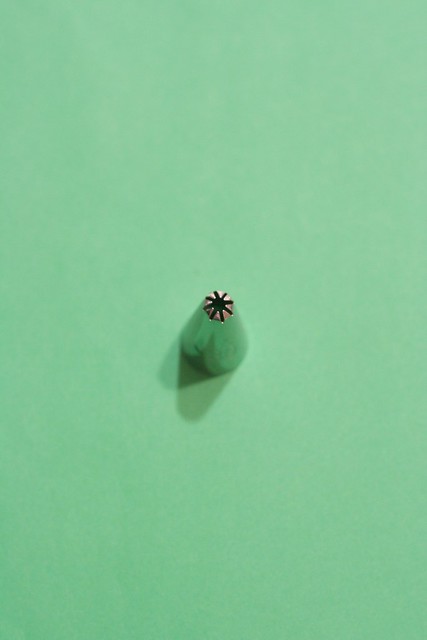
Step 4: Choose a decorating tip as you prefer.

Rainbow Swirl Icing in the making

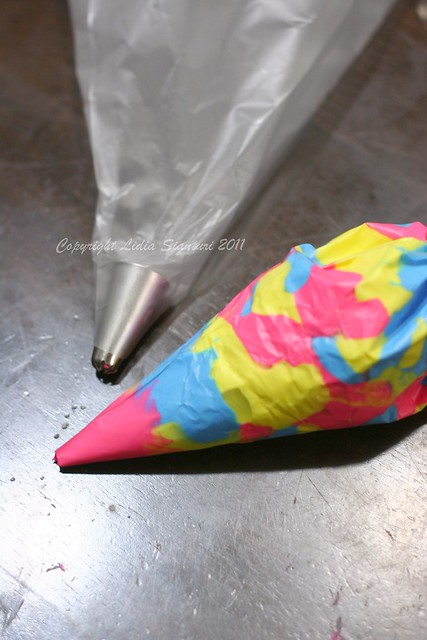
Step 5: Take another empty decorating bag and place the tip on top of it. Then place the bag with 3colored-buttercream inside it (so it's gonna be double bag). Now you are ready to decorate your cupcakes.
Since I could not take pictures while decorating it and no one's there to help me taking pictures, I would like to share a video I found on Youtube. This video will show you how to do the rose swirl.


Step 6: Decorating the cake using rose swirl method as shown on the above video (the movement started from the centre and goes out, while the classic swirl goes the other way around).
You may add some decorations like: sprinkles, silver beads, fruits, etc.

Rainbow Swirl Cupcake

Rose Fondant - Tutorial

Monday, October 3, 2011

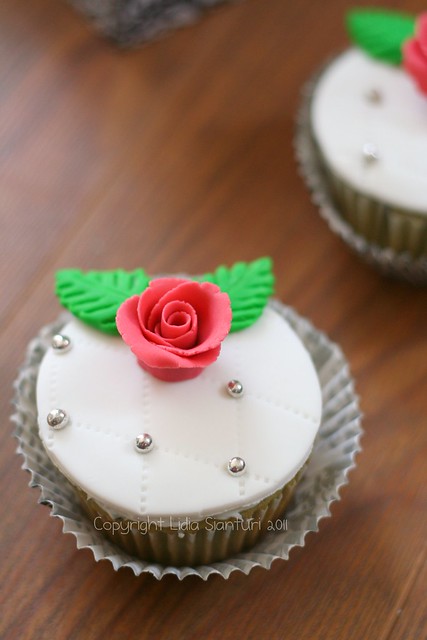
Rose cupcake

The other day I made a set of rose cupcakes for my dear friend's birthday and have promised to my readers that I will post a tutorial on how to make the rose fondant. To keep that promise, here is a simple step by step on how to prepare rose and leaf fondant.

What you need:
Some rolled fondant, colored as prefer
Sharp knife
A ziploc
Veining tool

Rose1

1: roll a long cylinder as shown on the picture
2: make 4 same size cuts
3: roll the first three into round balls and the last one into a cylinder

Rose2

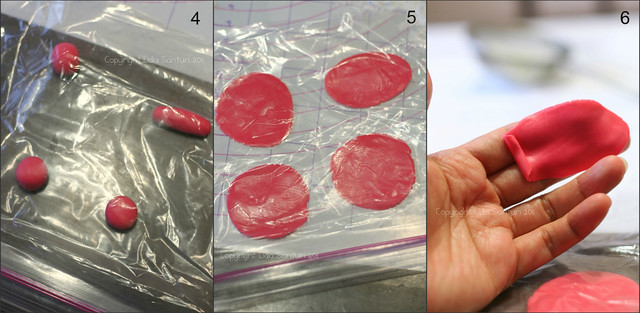
4: place them inside a ziploc.
5: flatten each of them using your thumb.
6: Take out the cylinder one and roll it from one side.

Rose3

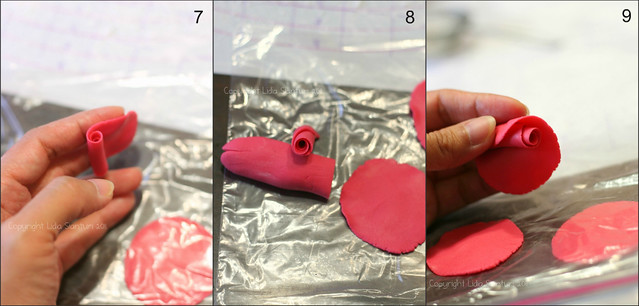
7: continue to roll to the other side
8: The result will look like "stigma"
9: Take one of the flatten round shape, and wrap around the "stigma".

Rose4

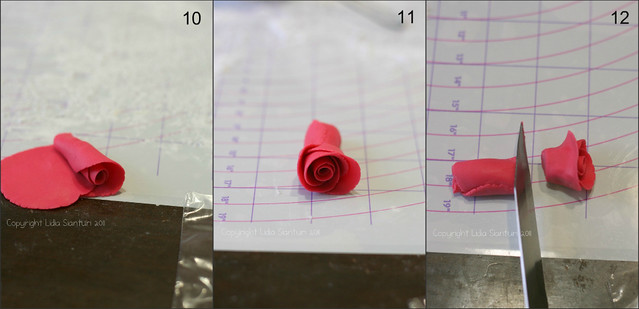
10: Take the second flatten round shape and place it overlap to the first one.
11: Do the same thing as for the last round shape.
12: Cut off the unwanted bottom part.

Rose5

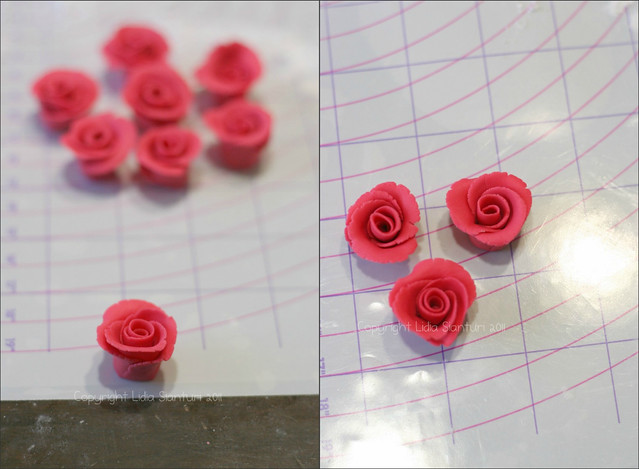
And here is the result....

leaves

Now to make the leaf.
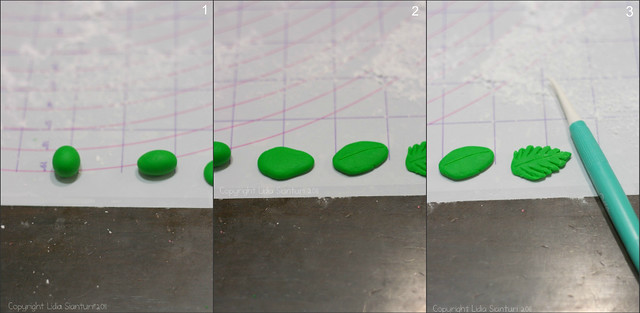
1: Make round shape of green colored fondant, then rolled it on palm of hand to form an oval.
2: Flatten the oval, make adjustment of the leaf shape using your finger as needed. Then mark the long centre part using veining tool.
3: Mark the margin with veining tool as shown on the picture.

Leaves

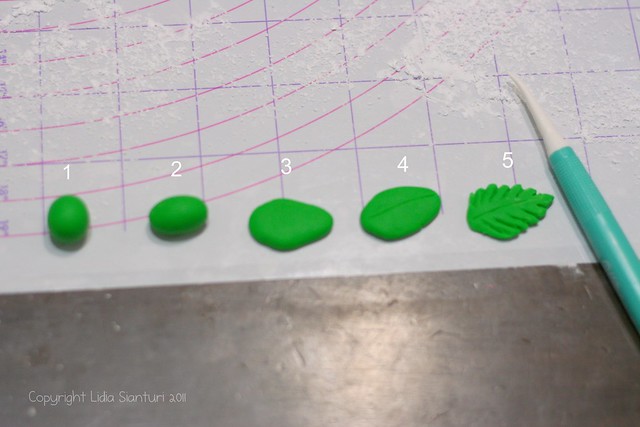
Here is a complete picture of the process of making the leaf.
Simple isn't it? Now is your turn to try...Keep practicing!

Puppy Theme Birthday Cake

Saturday, September 24, 2011

Puppy theme Cake

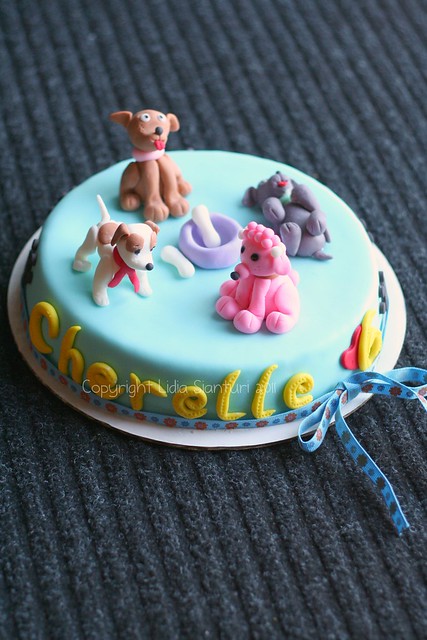
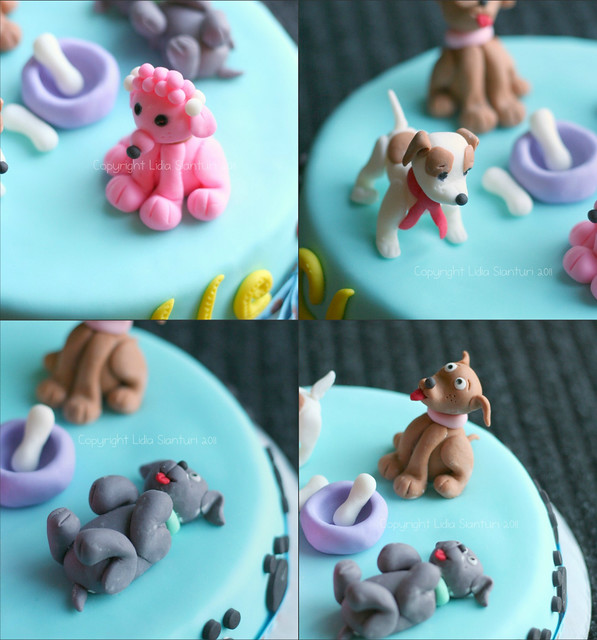
I made this cute cake last month for my friend's daughter's birthday. This post mainly shares pictures of the cake and some useful links to make the fondant puppy. Sorry as no recipe will be shared. The base is chocolate sponge cake and all the decoration made out of fondant (except for the ribbon). I decided to prepare 4 different kinds of puppy.

puppy1

Top left: I made this using a toy model (Bianca has Barbie doll carrying this puppy - Barbie A Fashion fairy tale).
Top right: Please follow this and this link for tutorial on how to make this puppy.
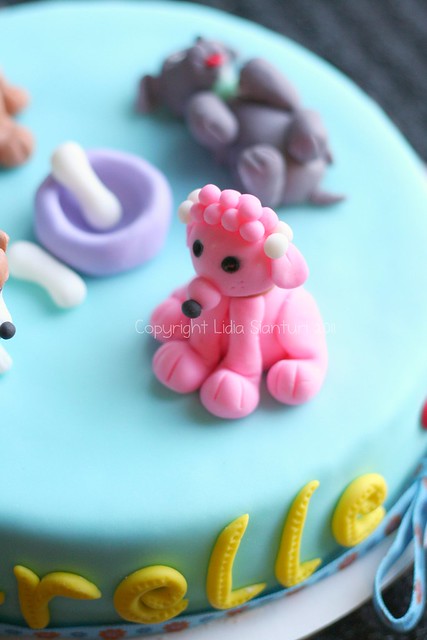
Bottom left: I had posted a tutorial on how to make it here. Originally I saw a picture with this puppy here and from there using my imagination to create this poodle puppy.
Bottom right: I made this puppy with the help of tutorial/pictures on flickr, somehow I could not find the link. Will be updated as soon as I found it.

puppy2

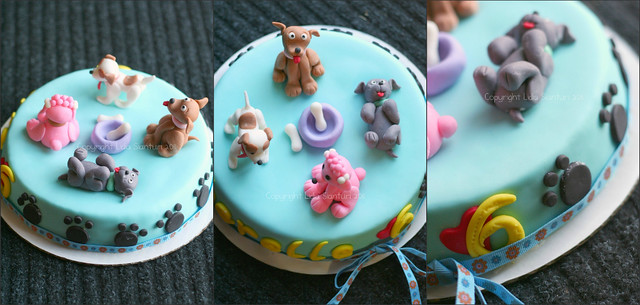
Those are pictures of how they look after I placed them on the cake. I also placed a bowl and 2 bones in the middle of the cake.

puppy3

The side of the cake was decorated with some paw prints, the birthday girl's name, a heart with the number of the age. Not to forget the ribbon to sweeten the cake.

Poodle Puppy Fondant - Tutorial

Thursday, September 15, 2011

Puppy theme Cake

So yes the other day I wanted to make a birthday cake for a sweet little girl. Since she loves puppies, I decided to make a puppy theme cake. I browsed around and found some cute pictures of puppy fondant. My eyes fixed on this cute poodle puppy and convinced myself that I could make it. While making it, I also took some picture and now I wanna share the step by step of making it. Hope it is useful.

Let's get started!
First, pick a color you like and mix it well to your white fondant. I chose pink, since my Bianca loves pink.

puppy1

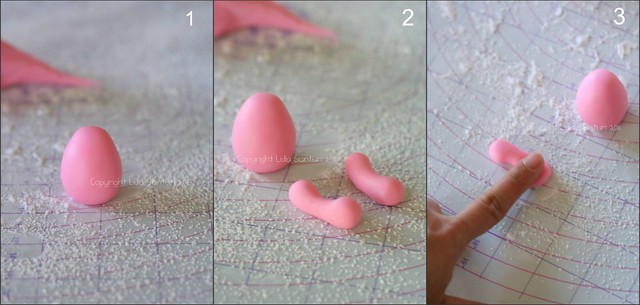
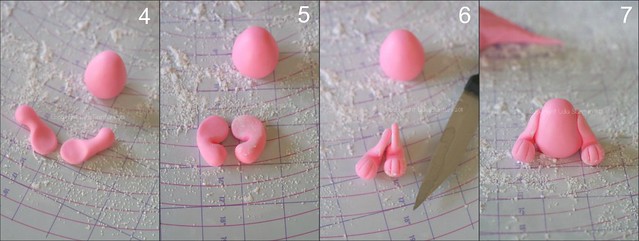
1. Make an egg shape as shown on the picture and let it stand on the table.
2. Make 2 bone shapes for feet, it is easier to make cylinder shapes first than roll the middle part using your point finger on your other palm hand (place the cylinder shape on your left palm hand and roll the middle part using your right point finger or vice versa).
3. Flatten one side of the bone

puppy2

4. Do it for both bones
5. Bend it a little bit, as shown on the picture
6. Slit 2 lines with a knife on the non-flatten part (for toes)
7. Glue the flatten part on the side of the egg body using some water

puppy3

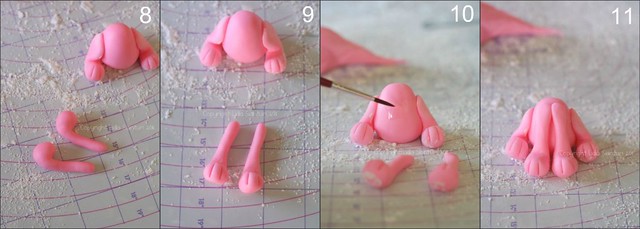
8. Make another two legs as shown on the picture. You may prepare two cylinder then roll the 3/4 part of it to form a smaller rod while leaving a bigger portion on one side.
9. Slit 2 lines using knife (the same as what we did on number 6)
10. Wet the front part of the body with water
11. Stick on the two feet

puppy4

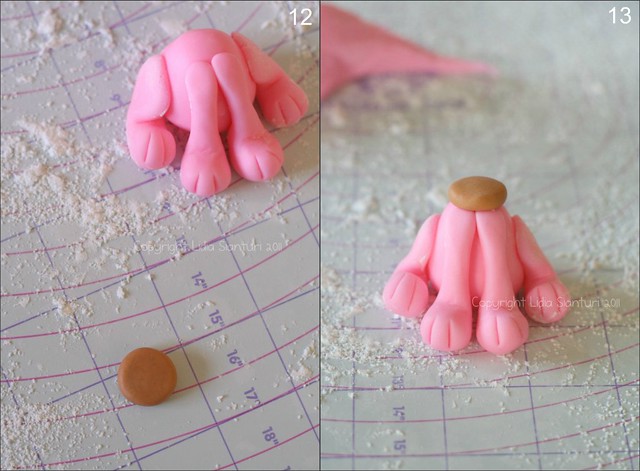
12. Make a round flat shape using other color for collar, I used brown
13. Glue it on top of the egg body

Poodle dog in the making

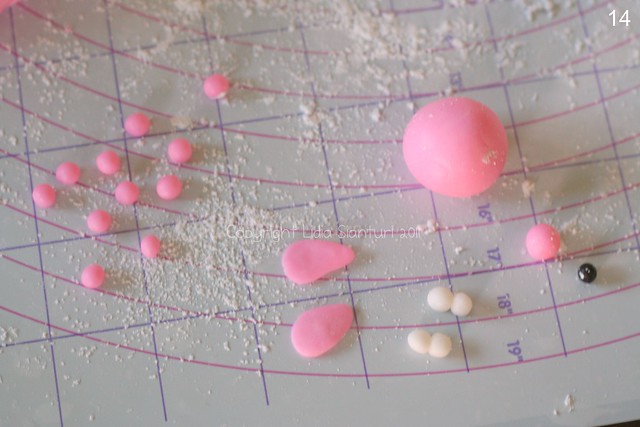
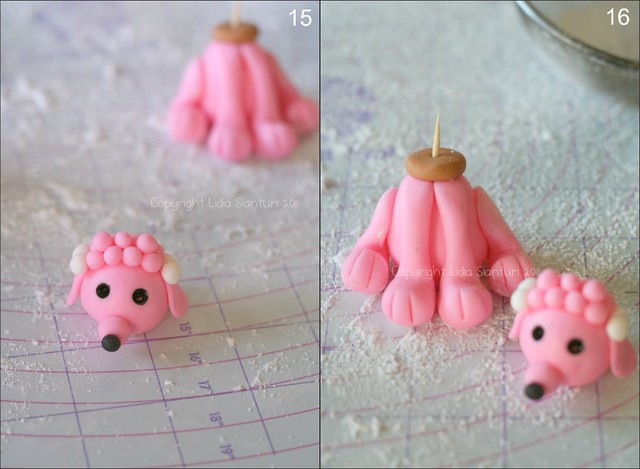
14. Make 11 small pink balls, 2 flat teardrops shapes for ears, one big pink ball (for head), 4 small white balls (stick two of them together) for hairpins, one pink ball (bigger than the 11 small pink balls) for nose, and one very small black ball for nose tip.

puppy5

15. Arrange the head as shown on the picture. First, stick two rows of 4 pink balls on top of the head (8balls). Then stick another 3 balls on top of those two rows. And then glue the flat teardrop shapes and top it of with the two double white balls/hairpins. Stick on the pink ball for nose and black ball for nose tip. Draw two big dots using edible black coloring pen for eyes (you may punch 2 holes on the eyes position using the round back of small painting brush, then color it).
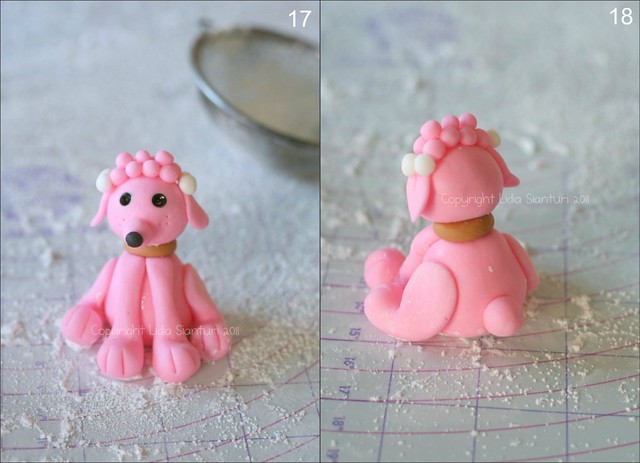
16. Stick in a tooth pick in the centre of the neck.

puppy7

17. Glue the head on top of the body with the help of the tooth pick and some water
18. Make a pink ball and stick it on the lower back of the body for tail

Dry it up on an open counter overnightly. Done. Easy right? Now it is your turn to create this cute poodle puppy. Happy fondant-ing!

Under the Sea Theme Cake Decoration - Tutorial

Monday, September 5, 2011

Bianca's birthday cake

I have promised to some of my beloved readers, that I will post a simple tutorial for a particular birthday cake which I prepared for Bianca's birthday last April. You may see the post about this cake here.
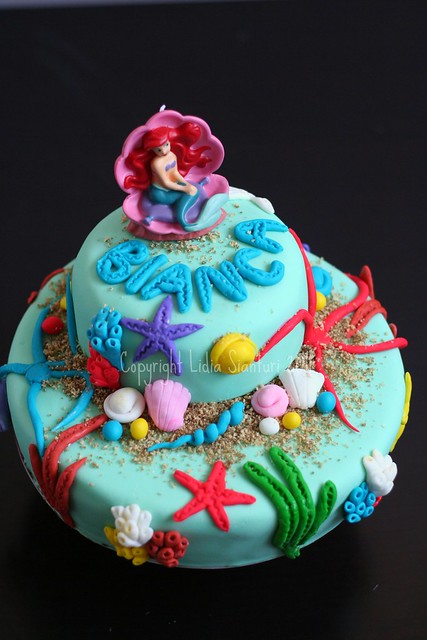
Since it is an "Under the Sea" theme, I had to fill the surface with sea creatures. I browsed around and found useful tutorial here and here. Others were just made using my imagination.

ganache covered collage

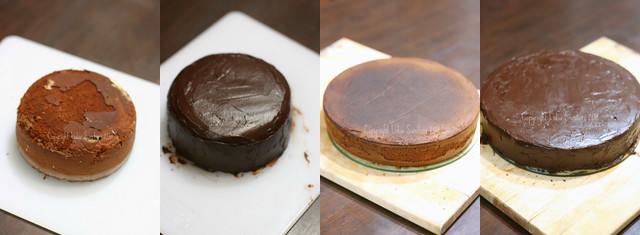
I will start with how to cover the cake with rolled fondant. I made two round shapes of choco "lapis surabaya" cakes (9 and 6 inches). Then spread some chocolate ganache on top and side of the cooled cakes and let them sit until set. You may prepare the cake a day before.

covering cake collage

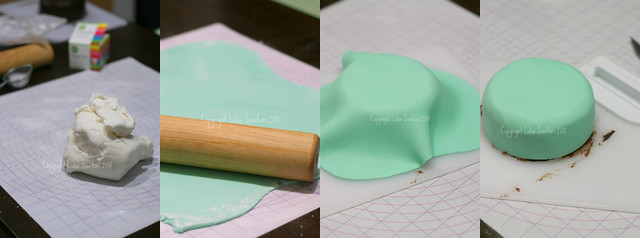
Then you may color the rolled fondant with the desired color. For this cake, I used mixed of blue and yellow gel coloring until I got the color I like. Flatten the colored fondant using rolling pin on powder sugar dusted surface. Keep rolling until the desired thickness (not too thin, so it would not tear during covering, app. 4-5mm). During rolling, lift up the fondant once awhile to avoid sticking on the table. Put the rolling pin in the middle and lift up the fondant unto it. Transfer the fondant immediately on top of the cake. Smoothen the to surface and then the side using the easy glide smoother. Trim off the excess fondant using sharp knife. For complete photo tutorial, check this out.

Sea Creatures

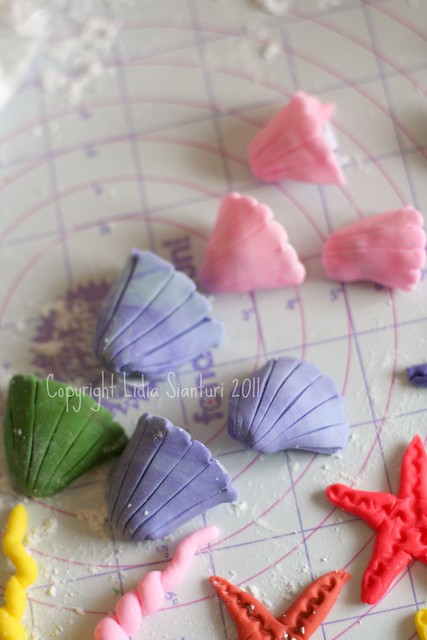
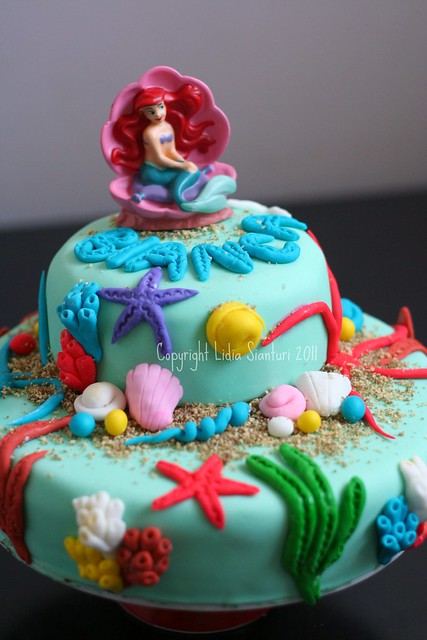
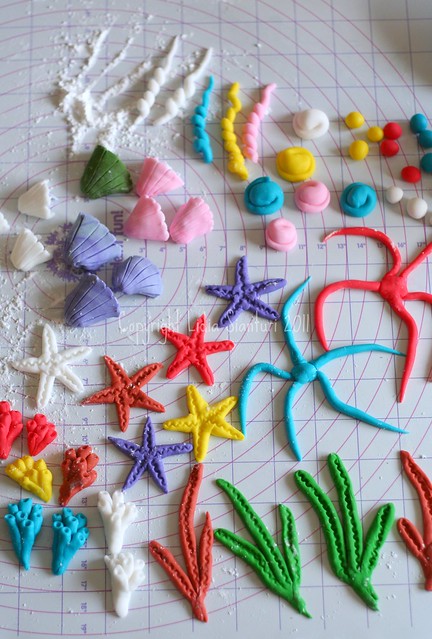
Now move on to the decoration, the above picture is all of the sea creatures I put on the cake.

Sea shells

Here is some cockle sea shells.

sea shells collage

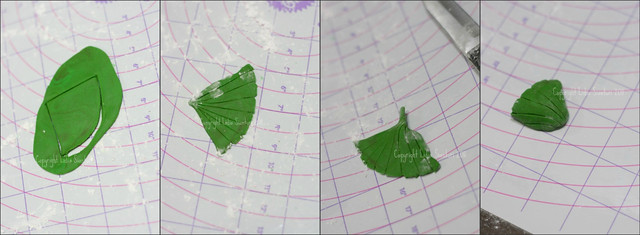
Start with flatten up some colored fondant, and cut out a triangle/wedge with a little curve on the bottom. Then using a knife, make some lines/grits as shown on the second picture (but do not cut it). Pinch the narrow end and fold it in or tuck it under the shell (as shown on picture no. 3 and 4). You may put some balled up wax paper or plastic to help keeping the shells curvy while drying up.

Sea serpent

Next some sea serpents.

sea serpent collage

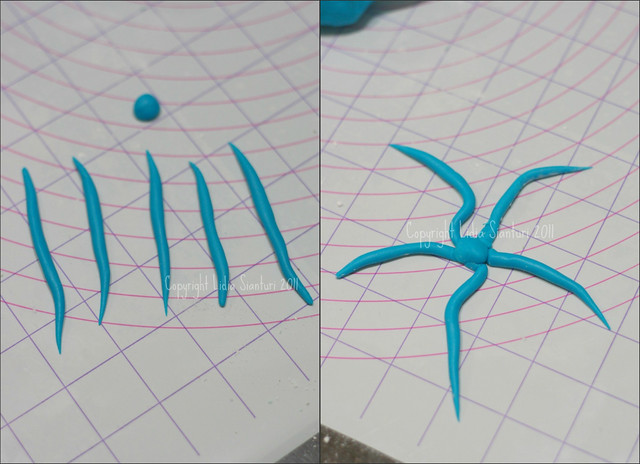
Make 1 little ball and 5 long skinny snakes as shown on the first picture. Use your palm hands to roll it skinnier. Arrange it as shown on the second picture. Flatten up the center ball.

Sea shells

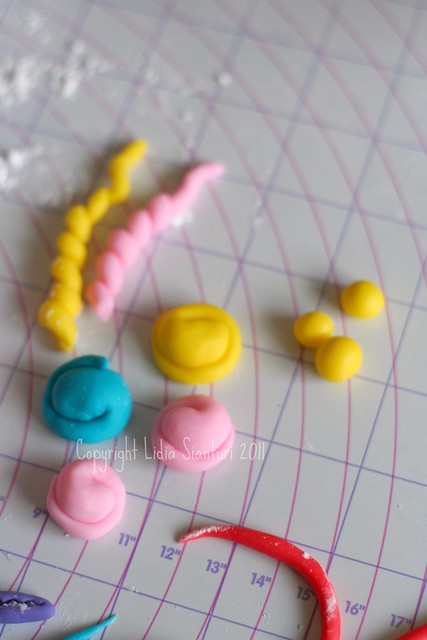
Other simple sea shells. The worm sea shells can be made by coiling a snake long shape of fondant and pulling the coil gently (see the above picture - yellow and pink worm sea shells).

sea shells2 collage

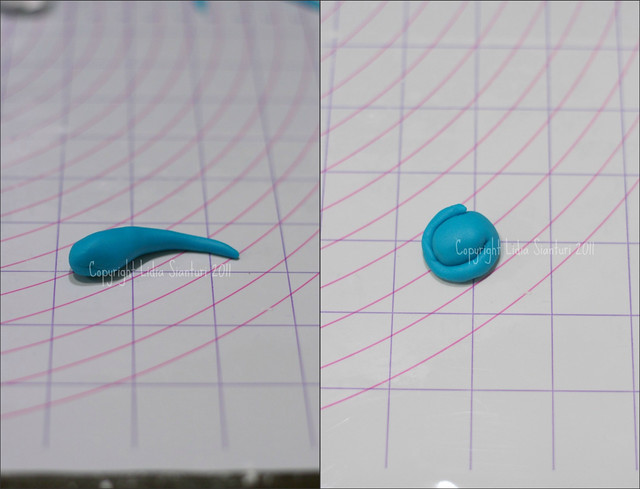
For simple sea shells, make a tadpole shape as shown on the first picture, and then curl in the smaller end and glue it on the big end using a little amount of water (as shown on picture no.2).

Sea Creatures

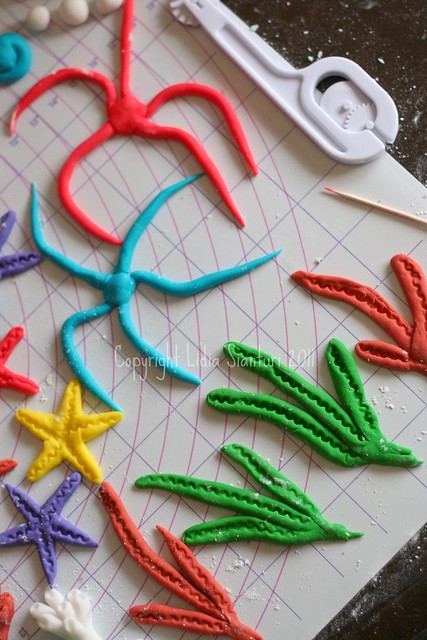
To make some seaweed, you just need 3 long skinny snakes and put one ends together. Then trace a line in the middle of each leaf using fondant embosser (see the above picture) to give a unique pattern. Sorry I did not take a step by step pictures for this.

Star fish

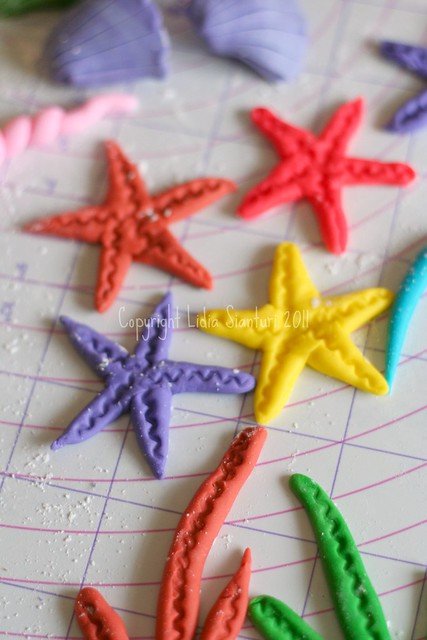
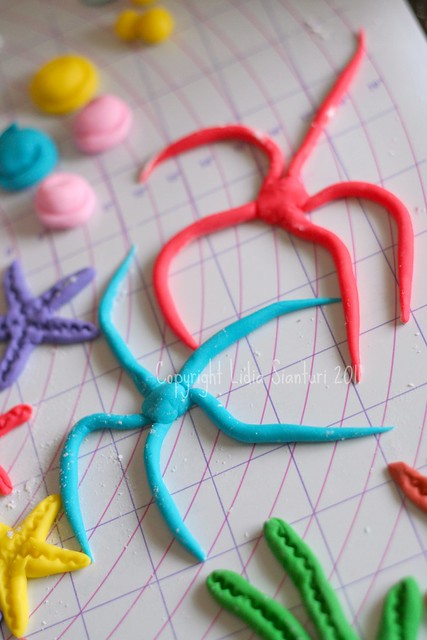
Some starfish can be made by putting together 5 arms and trace a line with the embosser just as I did with the seaweeds. (No step by step pictures available, sorry).

Coral Reef

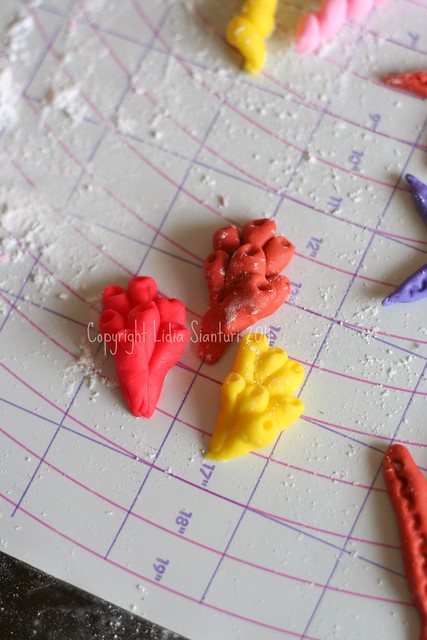
The last one, I made some coral reef by putting together 7 short pipes (just at one end), and squeezed them to give smaller shape on that end. Then make a hole on each pipes using toothpicks. No step by step pictures for this either.
Arrange the sea creatures on the cakes and stick them on using some water. To make sand, please read this post.
Well, that's it..Hopefully readers can understand my simple explanation. Please contact me for further questions on this simple tutorial. Happy decorating!
Princess Ariel Birthday Cake for My Beautiful Princess

Thursday, August 25, 2011


Front view - back focus

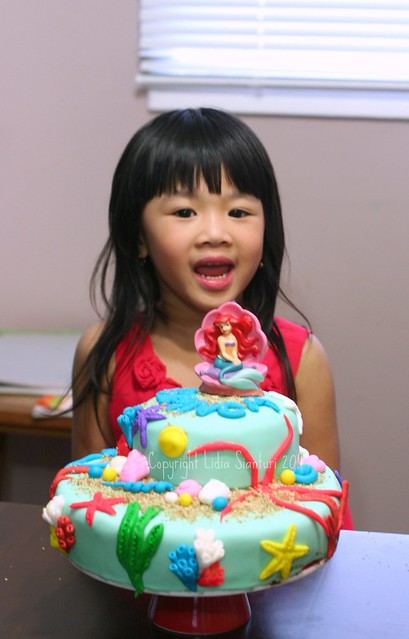
To make her kids happy is every mom's greatest desire. And that's my desire too to make my kids happy...super happy, especially on their birthday. It's been more than 3years I really wanted to make birthday cake for my own kids, well I have had that desire since Bianca was born. I envy people who have tons of activities, full time worker, yet still have time to make birthday cake for their owns. Thus last April, I put up together all my guts to make my very first fondant covered birthday cake for my Princess. She likes Princess Ariel, the Little Mermaid, so I decided to use "Under the Sea" theme. And here is the result...Look how happy she was!
Bianca's birthday

Ingredients:
Cake Base: I used 1.5x recipe of Lapis Surabaya cake (the economic version), but make it all chocolatey, no layer no filling.
A: (remember to multiply it by 1.5)
- 8 egg yolks
- 9 egg
- 300g fine granulated sugar
- 1 tsp vanilla essence
- 150g all purpose flour
- 1 tsp ovalet/emulsifier

B:
- 150g all purpose flour
- 25g corn starch

C:
- 250g melted margarine

D:
- 1 Tbsp rum
- 1 Tbsp chocolate paste

Decorations:
- Princess Ariel candle
- rolled fondant
- food grade gel coloring
- 2 pieces vanilla flavored wafers
- 2 Tbsp brown sugar
- chocolate ganache
- 2 bamboo skewers

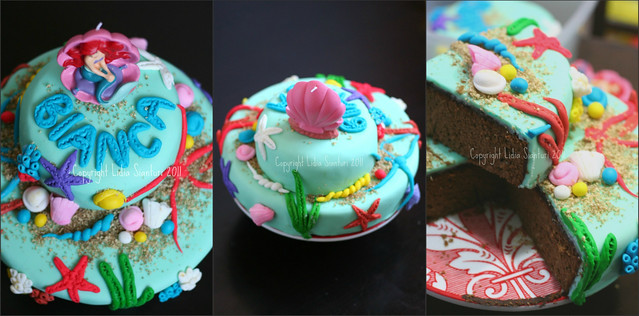
B's birthday cake collage

Directions:

Mix and whisk A until fluffy. Add B and mix it under low speed. Add C and mix it well. Add D into it and mix it well. Pour the batter into greased 9inches and 6inches round cake pans. Bake at 175C for 35min until done. Cool it off. Spread the chocolate ganache on top and side. Cover with colored rolled fondant. Put the small cake on top of the big one, insert 2 bamboo skewers to hold the two cakes together. Decorate as you like.
For sand: mix brown sugar and wafers in a chopper, then sprinkle on the cake at the desired part.

Note: tutorial on how to make sea creatures will be posted soon.

B's birthday collage1

I also want to submit this post to Masak Bareng Yuuk (birthday edition). Happy birthday Masbar!


Valentine's Cake - My Very First Cake Deco

Friday, February 19, 2010

Valentine's Cake

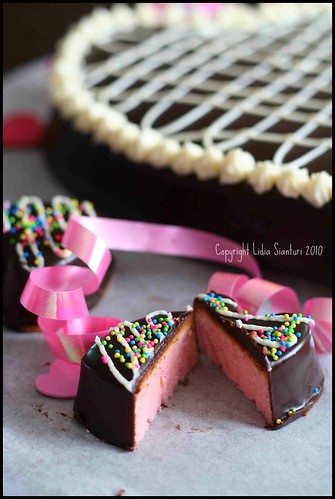
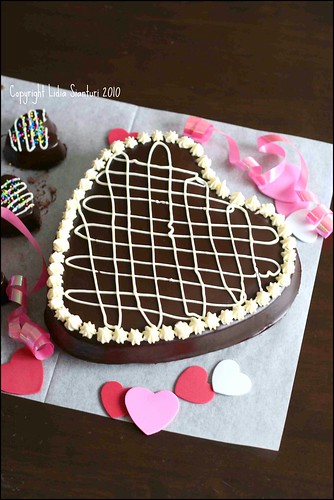
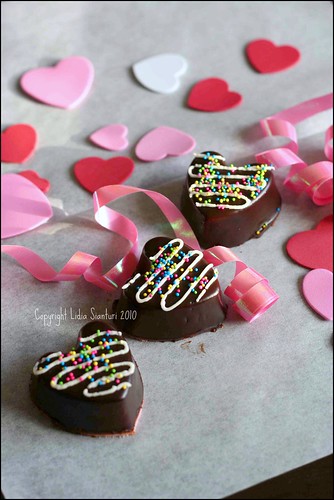
This year we did not do much for celebrating Valentine's Day due to our busy schedule. Not that we usually made it big no, well..at least we always had some fancy dinner on that day. My husband is attending school again and he had exam after the long weekend. Thus I only baked some cakes and for the first time ever, I decorated them using chocolate ganache, cream cheese frosting and some colourful sprinkles. Bianca loves the chocolate and sprinkles while Jordan loves the cake, so they share it. Still need a lot of practice and learn. So here is the cake recipe to share with you my beloved readers.

Valentine's Cake5

Strawberry Sponge Cake

Ingredients: (good for 1 medium size heart shape pan and 6 mini cupcake)
- 10 egg yolk
- 6 egg white
- 180g granulated sugar
- 200g all purpose flour
- 120gr soft margarine
- 1Tbsp of ovalette
- 1tsp of baking powder
- 4Tbsp of coconut milk
- 1tsp of strawberry paste
- 1tsp of vanilla essence

For decoration:
- chocolate ganache
- cream cheese frosting
- sprinkles

Valentine's Cake8

Directions:
Using a mixer, mix eggs, sugar and ovalette at medium high speed until fluffy and reaching good overrun. Add vanilla essence. Lower the speed of the mixer and add the flour and baking powder gradually. Add coconut milk and strawberry paste and continue to stir at low speed. Add soft margarine and stir it well. Preheat the oven at 370F. Pour the batter into a heart shape baking pan which was previously layered with margarine and flour, and pour the rest into a mini cupcake heart shape mould. Bake for 25-30minutes. Let it cool off.
Once it is cool enough, take it out of the pan, then pour the chocolate ganache over until all surface is covered. Keep it in a fridge until the ganache harden. Take it out and decorate it with some cream cheese frosting using cake decorating tips as preferred. At last add some sprinkles on the mini cupcakes.

Bianca's and Jordan's Mom Copyright © 2009 Designed by Ipietoon Blogger Template for Bie Blogger Template Vector by DaPino