Cenil - A Colorful Indonesian Traditional Tapioca Snack

Sunday, July 29, 2012

Cenil

Hello beloved readers, I am glad to be able to say hi to you all again, after this long hiatus. Today I wanna share a colorful Indonesian traditional tapioca snack. As our Masak Bareng Yuuk celebrates its birthday this month, and it brings a theme of "Foods made of Sago and Tapioca". It is called cenil (pronounced as "che neel"). It is normally sold at a traditional market along with other various traditional snacks. The texture is chewy and the taste is mixed of salty (from the salt added to the shredded coconut meat) and sweet (from the granulated sugar added before consumption). Well, let's jump into business, the recipe..I got it from here. And I was using the second version. It was a little tricky at first, eventually I got it done.


Here is the English version of the recipe:

Ingredients:
250g tapioca flour
2Tbsp cold water
125ml boiling water
1/2 tsp salt
250g shredded coconut milk
1 pandan leaf
100g granulated sugar
food coloring: red, green, yellow

Directions:
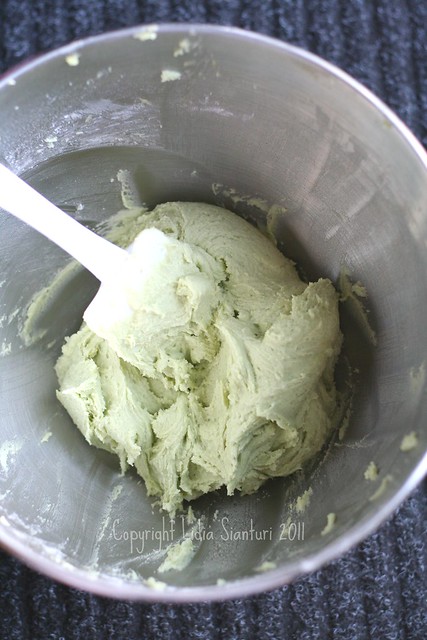
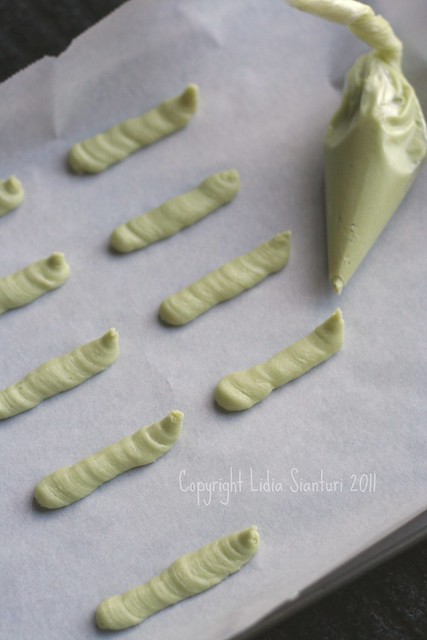
Steam the shredded coconut meat together with pandan leaf and salt for 15min. Keep it aside. Take 1Tbsp of tapioca flour and then mix it with 2Tbsp of cold water until all dissolved. Pour it into boiling water on the stove, stir instantly and keep stirring it until thicken. Turn off the stove and add the rest of tapioca flour little by little while mixing it until it does not stick. Divided into 4, and add each of the food coloring into each portion. Form a long oval or wormy shapes of the dough. Then boil some water in a pot. Cook them in the boiling water until floating. Take them out and instantly dip them into shredded coconut meat. Sprinkle some granulated sugar before serving.

Happy birthday Masbar!


Hello Kitty Fondant Figurine - Tutorial

Thursday, June 21, 2012

Hello Kitty Figurine


It is such a relieve to be able to sit in front of my computer and typing something for you..sharing this post is such a joyful moment.
I know it is long overdue..I've promised you all to share this tutorial couple months ago and kept forgetting to type it. So today is the day.. (while I have time to type). 
I made this Hello Kitty figurine for a girl birthday cake last year, so you will find the watermarks is in 2011.  Let's start!

What you need:

- white rolled fondant, approximately 1.5 cup
- blue, red, yellow, black gel food coloring (I used gel coloring from Spiderman series by Wilton)
- sharp knife
- ball fondant tools
- small brush
- water
- powdered sugar
- mat
- toothpicks

Always work on a powdered mat (using powdered sugar). Start to color small portion of the white fondant with blue, red, black and yellow coloring.

HK1

1. Make a ball for head from the white fondant.
2. Pinch the up left and right side of the ball using your finger to form ears, then by using the  ball tools, mark the ear holes.
3. Form 2 small balls of black fondant, and one small ball of yellow fondant, using the back wooden side of a brush, mark three holes for eyes and nose.
4. With the help of the brush wet the holes and then stick the black balls in to the eyes holes and the yellow ball to the nose one.

HK2

5. Make a flat round shape of red fondant and a tie-like shape one too.
6. Glue the round shape unto the tie shape with some water to form a bow.
7. Make six thin worm shape of black fondant.
8. Arrange the six worm shapes on the left and right cheeks as whiskers and the red bow on the head.

HK3

9.  Make an oval ball of white fondant for the body.
10. Roll a sheet of blue fondant for the overall shirt.

11. Wrap around the oval ball of white fondant, glue it on with some water.
12. Make two strips of blue fondant .

HK4

13. Place and glue the blue strips on the shoulder to complete the overall shirt. And add 2 white buttons using round flat shape of white fondant.
14. Make two hands as shown (it is simply made from an oval shape and then flatten and grit with a knife for fingers).
15. Make two feet as shown (simply made from an oval shape and then pinch the rear part with point finger.
16. Place and glue the hands, and then glue the head on the body (use a toothpick as necessary).

HK5

17. Place and glue the feed and support the bottom rear body with a wooden part of a brush (this is a place for tail later).
18. Prepare 8 very thin worm shape of red fondant, and glue them on the body to give accent as stripy shirt (two for each arms, and 3 on the chest and 3 on the back, see a bigger picture below). 
19. Prepare 2 very thin worm shape of black fondant and glue them on both arms.
20. Make a small ball of white fondant and glue them as a tail.

And tadda...final product! Hope it is clear enough and happy practicing!


IMG_1484

Cheesy Tuna Tartlet (Pie Tuna Keju Mini)

Wednesday, May 30, 2012

Tuna tartlet 


I love pastry, pie or tart..more to the savory ones...So when the theme for Masbar this month is Tart&Pie, I tried to find a recipe for savory filling. Then I found a recipe of cheesy crab tartlets here. It looks delicious and I decided to try it out. Later I changed my mind and used tuna instead. The result was so yummy..I could not stop eating...


Here is my version of cheesy tuna tartlets to share with all the Indonesian foodies at Masbar.

Ingredients:
24 mini tartlet shells (available frozen at stores)
225g cream cheese, softened
1 can of tuna chunk meat, drained
2 Tbsp mayonnaise
2 Tbsp grated Parmesan cheese
60g grated Cheddar cheese
2 Tbsp thinly sliced green onion
1 tsp Worcestershire sauce
bunch of peterselli for garnishing

Directions:
Preheat oven to 375F and bake the tartlet shells according to the instruction on the packaging. Cool them off and set them aside. Meanwhile,  in a large bowl, mix well cream cheese, tuna, mayo, both cheese, green onion and Worcestershire sauce. Spoon 1tsp of the mixture into the already cool shells. Then bake again at 375F for 15min.

Sambal Kecap (Spicy Sweet Soy Sauce)

Monday, April 30, 2012

Sambal Kecap 


Kecap or sweet soy sauce is well known in Indonesia as one of essential sauces which used quite often. And in our home, it is always available on the table, since my husband loves to eat every thing with it..yes literally every thing. To participate in the IDFB Challenge 4, with Sambal theme, I would like to share this Sambal Kecap recipe. It can be eaten with various soups or bbq. This time we eat it with chicken on skewer or sate/satay.


Ingredients:
8 chili paddy (add to your level of spiciness), chopped
2 cloves of shallot, chopped
2 cloves of garlic, chopped
1 tomato, chopped
1 tsp of ground white pepper
1/2 cup of sweet soy sauce
1 jeruk limo (Citrus amblycarpa)

Directions:
Mix all the ingredients together in a small bowl, then at last drizzle the jeruk limo juice over.

Spring Theme Steamed Cupcakes

Sunday, April 1, 2012

Bolu Kukus (Steamed Cupcakes)

I have made this kind of steamed cupcakes many times, simply because my daughter loves them. I have tried several recipes, the last one which I like was from NCC site. However I found out that this one was too dense, so I tried to modify the recipe by reducing the quantity of flour and increasing the quantity of liquid, and came up with the final recipe which I stick to it ever since. This time I colored it with purple and pink as spring is here. Happy Spring every one!


Bolu Kukus (Steamed Cupcake)

Ingredients:
4 eggs
275 granulated sugar
1.5 Tbsp ovalet/emulsifier
300ml clear/no color soda drink
375g all purpose flour
2tsp vanilla liquid
food coloring

Directions:
Beat the eggs, sugar and emulsifier at high speed until stiff. Lower the speed and stir in flour little by little and mix it well. Add soda drink and mix it well. Add the vanilla and mix it well again. Take two small portion of the batter and place it in two small bowls. Mix in the food coloring in each bowl. Pour the batter into the lined mould to the half height. Then add 2tsp of the colored batter. Do it for all the batter. Then steam them for 20min in a preheated steamer.

Bolu Kukus (Steamed Cupcakes)

Mango Sticky Rice Dessert - Love on the Plate

Saturday, March 31, 2012


Mango Sticky Rice Dessert

I am sure some of you may know and have tasted this sweet dessert. My first encounter to this yummy dessert was back when I lived in Australia. This dessert is from Thailand and has spread out around the world. I was craving for this dessert when I saw a very intimidating picture of my dear foodie friend who recently travelled to Bangkok and had this dessert there (lucky you Rita!).
So here is my version of mango sticky rice dessert.

Ingredients:
200g sweet glutinous rice, soaked overnight
2 pandan leaves
1 can of coconut milk (app. 400ml)
1/2 block of palm sugar (app. 80g), shredded
salt
1 Thai mango

Mango Sticky Rice Dessert

Directions:
Rinse and drain the glutinous rice, then add 1/2 can of the coconut milk and some salt. Stir it well. Add one of pandan leaf. Then place the mixture in a heat resistant container for steaming. Steam it until cooked (the rice becomes clear and sticky) app. 40min.
Meanwhile boil the other half can of coconut milk and then add the shredded palm sugar, pandan leaf and some salt. Mix it well.
To serve, place some scoop of the steamed sticky rice, top it up with some cut mango and pour the sweet sauce on top.
I would like to share this recipe for the event of Masak Bareng Yuuk - Love on the Plate.


Sari Kacang Ijo (Mung Bean Juice)

Thursday, February 23, 2012

Wedang Sari Kacang Ijo


Mung beans is so popular in Indonesia and consumed mostly as bubur kacang hijau, also used as filling for some traditional snack (bakpia, kue ku, etc.). It is rich in fiber and vitamin B. I used to like to drink this mung bean juice which comes in a tetra package and easily found in a grocery store. Now that I live abroad, I could not find that mung bean juice, except by making it myself. So the other day, I prepared this juice and enjoyed every sips of it.
While sharing the recipe, I also want to participate on IDFB Challenge 3 (Indonesian Beverages).


Ingredients:
150g mung beans, soaked overnight
1L water or more
4cm of ginger, bruised
1 pandan leaf
1 block of palm sugar
1Tbsp of granulated sugar
1tsp of vanilla essence (optional)

Directions:
Rinse the soaked beans and drained off the water. Boil in water until cracked and soft (approximately for an hour). Cool it off and crush it in a blender, add some water as needed. Using a kitchen strainer, separate the juice from the pulp. While straining, stir the blended juice occasionally. You may re-do the blending and straining procedures with the pulp and discard the last pulp. Then re-boil the juice and add the remaining ingredients. Adjust the taste to your preference with granulated sugar. Discard ginger and pandan leaf before serving. Serve it as warm or cold drink.

Green tea Kattetong/Cookies (Lidah Kucing Hijau)

Thursday, February 16, 2012

Green Tea Katetong (Cat's Tongue Cookies)

I have a good foodie friend who loves chocolate and green tea so much. And she does not stop there, she moves along to create foods by substituting the ingredient with green tea..and it always came out lovely. One of her creations was this green tea kattetong. I made this myself in July last year after seeing the recipe of hers and would like to share the English version for you.

Source: Kedai Rachmah (In Indonesian)
Ingredients:
125g butter
85g fine granulated sugar
35mL egg white
1 egg yolk
120g low protein wheat flour (I used all purpose flour)
1tsp of matcha/green tea powder
1/4tsp green tea paste (I skipped this one)
2g baking powder
3g Emplex (I skipped this one, this is used to make the cookie crunchier)

In the making

Direction:
Beat the butter, emplex (if used), sugar and green tea paste until smooth and fluffy. Add the egg yolk, mix it well. Then add the egg white, beat again until smooth and well blended. Gradually add flour, baking powder, and green tea powder and mix it with lower speed. Place the dough inside a piping bag and cut it out for 1cm (diameter) hole at the tip. Then squeezed out the dough into a greased kattetong mould.

In the making

Since I do not have the mould, I just placed the dough on a cookie tin which was lined with a piece of parchment paper ( as shown on the above picture).
Bake in a preheat oven at 300F for 12-15min until done.
You may add some sesame seeds, like what I did before. And I love the one with these sesame seeds better.

Note: for a better look, choose black sesame seeds to give a beautiful contrast.

Green Tea Katetong (Cat's Tongue Cookies w/ Sesame Seeds)

Char Kway Teow (Kweetiaw Goreng)

Monday, February 6, 2012

Kwetiaw Goreng

It's been a long while I did not update this food blog of mine. Life is so busy with the kid going to school and stuff. So I am happy today I manage to sit in front of my computer and type this post. The picture was taken last year and chosen to share today. This dish has become our favorite quick and easy menu. I have shared the recipe back in year 2008 here, but this time I am using different kind of meat.

Ingredients:
- 1 package of flat rice noodle
- 1 chicken breast fillet, thinly sliced
- 4 chicken wieners, cut into 1cm thickness
- 6 cloves of garlic, chop thinly
- 5 cloves of shallot, chop thinly
- 1Tbsp of sesame oil
- 1Tbsp of oyster sauce
- 2Tbsp of sweet soy sauce
- 3Tbsp of fish sauce
- 1tsp of ground white pepper
- a bunch of pak choi or caisim (Indonesian-sawi hijau), cut into 5cm in length
- a bunch of bean sprout
- 3 green onion, chop thinly
- water
- oil

Directions:
In a pot, boil some water and then cook the noodle in until tender. Drain off the water with a strainer and add some oil and immediately mix it well. Put it aside.
In a wok, saute garlic and shallot with oil until fragrant. Add chicken and wieners and continue to cook until the chicken changed color. Add fish sauce, oyster sauce, sweet soy sauce, pak choi and pepper, stir it well. Add the boiled noodle and stir it well until all the seasoning distributed evenly. Adjust the taste with fish sauce and sweet soy sauce. At last add green onion, bean sprout, sesame oil, stir it immediately and remove it from the stove.
To serve, sprinkle some fried onion on top.

Bianca's and Jordan's Mom Copyright © 2009 Designed by Ipietoon Blogger Template for Bie Blogger Template Vector by DaPino