Asian Salad

Friday, June 20, 2014

It's been too long, yes I know..I have been away for too long, this blog is abandoned with no update and no posting for more than a year. My apology. I have too many excuses that I do not feel like sharing them (embarrassing...)
So here is my take on Asian Salad..we love it, we super love it and we have it often at home and share it with friends too. Oh btw, I got the recipe from tante Sheyla, a friend of us. Thank you tante for sharing the recipe with us.


Ingredients:
- half of red bell pepper, cut
- half of orange bell pepper, cut
- half of yellow bell pepper, cut
- 1 cucumber , slice
- 1 Chile mango, slice
- half of purple onion, chopped
- grape tomato

Dressing:
- 2Tbsp of fish sauce
- bunch of cilantro, cut
- 1 lime
- 1 tsp of granulated sugar
- salt and pepper to taste


Directions:
Wash and cut all of the veggies as preferred. Then in a small bowl, mix well all of the dressing ingredients. Pour dressing over salad and toss gently. Serve immediately.

I am submitting this for Masak Bareng Yuuk.


Bubur Gudeg (Savory Porridge with Green Jackfruits Sweet Stew)

Saturday, March 30, 2013


It has been a longggg while..this looks like an abandoned blog...and sadly it is. Life has been so busy with both kids at school now. This post is my first post in the year of 2013. So here is a late happy new year for all of you. We are doing fine and kicking...
Now about this post, I would like to submit this post to the Indonesian Foodblogger Challenge #9. Congee or Porridge.


I personally have a fond memory about this dish. As I spent my university years in Yogyakarta, the town where this food is widely known. Bubur gudeg is normally served as breakfast, and is sold at street food vendor early in the morning. It is served as breakfast since porridge is considered not so heavy fulfilling food but heavy enough to start the day; while gudeg itself can be served with steamed rice for lunch or dinner and it is normally in a dryer form.
In term of taste, bubur gudeg has its own uniqueness as bubur is savory and gudeg is at sweet part, and sambal goreng krecek as part of this dish serves the spiciness. Originally gudeg is cooked for hours or sometimes in 2 days in a soil pottery using teak leaf to get the desired color, flavor, texture and appearance. Thus this dish is rich and unique. In modern setting, people use slow cooker or regular pot for some hours and add some teabags to get brownish color.


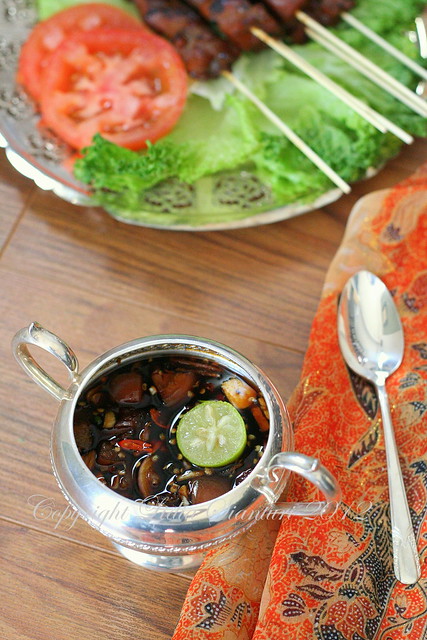
So here is my version of bubur gudeg, the recipe is from here and there, serve 8

Bubur/Porridge
- 3C of jasmine rice
- 1.5L of water
- 1 stalk of lemon grass, cut into 2
- 3 Indonesian bay leaves
- salt
Cook it in a rice cooker or in a pot until soft, stir it as needed.

Gudeg/Green Jackfruits Sweet Stew
- 2 can of green jackfruits
- 8 pieces of chicken thigh/drumstick
- 1 can of coconut water
- 1 can of coconut milk
- 4 cloves of shallot
- 6 cloves of garlic
- 1Tbsp of ground coriander
- 2Tbsp of shredded palm sugar
- salt
- 3 Indonesian bay leaves
- 4 cut of galangal
- 2 teabags
Arrange the ingredients in a slow cooker in order from  bottom to top: galangal, bay leaves, green jackfruits, chicken thigh/drumstick. Then pour crushed seasoning, salt, coconut water and coconut milk. Stir slowly. Switch on the slow cooker. Cook for 2hours or until boiling, then add the teabags. Cook for another 3hours or until the color of tea immersed. Then take out and discard the teabags. Add the palm sugar and lightly stirred. Continue to cook for at least 8hours in total.

Sambal Goreng Krecek
- 2C of krecek or beef skin, soaked and squeezed out the water
- 1C of cowpeas, cooked
- 1/2C of stinky beans
- 3 cloves of shallot
- 4 cloves of garlic
- 2 candle nuts
- 2 red chili pepper
- 5 bird's eye chili
- 1 stalk of lemon grass, cut into 2
- 2 cut of galangal
- 3 kaffir lime leaves
- salt
- sugar
- 1C of coconut milk
- oil for sauteeing
Crush shallot, garlic, candle nuts, and chili until smooth. Then saute with a little bit oil until fragrant. Add lemon grass, galangal, lime leaves, coconut milk, salt and sugar. Cook and stir until boiling. Add the stinky beans and cook for 4min. Add beef skin and cowpeas, stir it well and cook until almost all of the coconut milk absorbed.

Telor Pindang
- 8 large size eggs
- 700mL water
- 3 Indonesian bay leaves
- 1/2C of shallot peels
- 2 teabags
- salt
Put all of the ingredients in a pot, then cook. When it is boiling for 2min, crack the eggs at several part and put it back into the pot and continue to cook. Lower the heat until minimum and cook for another 15min.

Serve them warm all together in a large bowl.

Cenil - A Colorful Indonesian Traditional Tapioca Snack

Sunday, July 29, 2012

Cenil

Hello beloved readers, I am glad to be able to say hi to you all again, after this long hiatus. Today I wanna share a colorful Indonesian traditional tapioca snack. As our Masak Bareng Yuuk celebrates its birthday this month, and it brings a theme of "Foods made of Sago and Tapioca". It is called cenil (pronounced as "che neel"). It is normally sold at a traditional market along with other various traditional snacks. The texture is chewy and the taste is mixed of salty (from the salt added to the shredded coconut meat) and sweet (from the granulated sugar added before consumption). Well, let's jump into business, the recipe..I got it from here. And I was using the second version. It was a little tricky at first, eventually I got it done.


Here is the English version of the recipe:

Ingredients:
250g tapioca flour
2Tbsp cold water
125ml boiling water
1/2 tsp salt
250g shredded coconut milk
1 pandan leaf
100g granulated sugar
food coloring: red, green, yellow

Directions:
Steam the shredded coconut meat together with pandan leaf and salt for 15min. Keep it aside. Take 1Tbsp of tapioca flour and then mix it with 2Tbsp of cold water until all dissolved. Pour it into boiling water on the stove, stir instantly and keep stirring it until thicken. Turn off the stove and add the rest of tapioca flour little by little while mixing it until it does not stick. Divided into 4, and add each of the food coloring into each portion. Form a long oval or wormy shapes of the dough. Then boil some water in a pot. Cook them in the boiling water until floating. Take them out and instantly dip them into shredded coconut meat. Sprinkle some granulated sugar before serving.

Happy birthday Masbar!


Hello Kitty Fondant Figurine - Tutorial

Thursday, June 21, 2012

Hello Kitty Figurine


It is such a relieve to be able to sit in front of my computer and typing something for you..sharing this post is such a joyful moment.
I know it is long overdue..I've promised you all to share this tutorial couple months ago and kept forgetting to type it. So today is the day.. (while I have time to type). 
I made this Hello Kitty figurine for a girl birthday cake last year, so you will find the watermarks is in 2011.  Let's start!

What you need:

- white rolled fondant, approximately 1.5 cup
- blue, red, yellow, black gel food coloring (I used gel coloring from Spiderman series by Wilton)
- sharp knife
- ball fondant tools
- small brush
- water
- powdered sugar
- mat
- toothpicks

Always work on a powdered mat (using powdered sugar). Start to color small portion of the white fondant with blue, red, black and yellow coloring.

HK1

1. Make a ball for head from the white fondant.
2. Pinch the up left and right side of the ball using your finger to form ears, then by using the  ball tools, mark the ear holes.
3. Form 2 small balls of black fondant, and one small ball of yellow fondant, using the back wooden side of a brush, mark three holes for eyes and nose.
4. With the help of the brush wet the holes and then stick the black balls in to the eyes holes and the yellow ball to the nose one.

HK2

5. Make a flat round shape of red fondant and a tie-like shape one too.
6. Glue the round shape unto the tie shape with some water to form a bow.
7. Make six thin worm shape of black fondant.
8. Arrange the six worm shapes on the left and right cheeks as whiskers and the red bow on the head.

HK3

9.  Make an oval ball of white fondant for the body.
10. Roll a sheet of blue fondant for the overall shirt.

11. Wrap around the oval ball of white fondant, glue it on with some water.
12. Make two strips of blue fondant .

HK4

13. Place and glue the blue strips on the shoulder to complete the overall shirt. And add 2 white buttons using round flat shape of white fondant.
14. Make two hands as shown (it is simply made from an oval shape and then flatten and grit with a knife for fingers).
15. Make two feet as shown (simply made from an oval shape and then pinch the rear part with point finger.
16. Place and glue the hands, and then glue the head on the body (use a toothpick as necessary).

HK5

17. Place and glue the feed and support the bottom rear body with a wooden part of a brush (this is a place for tail later).
18. Prepare 8 very thin worm shape of red fondant, and glue them on the body to give accent as stripy shirt (two for each arms, and 3 on the chest and 3 on the back, see a bigger picture below). 
19. Prepare 2 very thin worm shape of black fondant and glue them on both arms.
20. Make a small ball of white fondant and glue them as a tail.

And tadda...final product! Hope it is clear enough and happy practicing!


IMG_1484

Cheesy Tuna Tartlet (Pie Tuna Keju Mini)

Wednesday, May 30, 2012

Tuna tartlet 


I love pastry, pie or tart..more to the savory ones...So when the theme for Masbar this month is Tart&Pie, I tried to find a recipe for savory filling. Then I found a recipe of cheesy crab tartlets here. It looks delicious and I decided to try it out. Later I changed my mind and used tuna instead. The result was so yummy..I could not stop eating...


Here is my version of cheesy tuna tartlets to share with all the Indonesian foodies at Masbar.

Ingredients:
24 mini tartlet shells (available frozen at stores)
225g cream cheese, softened
1 can of tuna chunk meat, drained
2 Tbsp mayonnaise
2 Tbsp grated Parmesan cheese
60g grated Cheddar cheese
2 Tbsp thinly sliced green onion
1 tsp Worcestershire sauce
bunch of peterselli for garnishing

Directions:
Preheat oven to 375F and bake the tartlet shells according to the instruction on the packaging. Cool them off and set them aside. Meanwhile,  in a large bowl, mix well cream cheese, tuna, mayo, both cheese, green onion and Worcestershire sauce. Spoon 1tsp of the mixture into the already cool shells. Then bake again at 375F for 15min.

Sambal Kecap (Spicy Sweet Soy Sauce)

Monday, April 30, 2012

Sambal Kecap 


Kecap or sweet soy sauce is well known in Indonesia as one of essential sauces which used quite often. And in our home, it is always available on the table, since my husband loves to eat every thing with it..yes literally every thing. To participate in the IDFB Challenge 4, with Sambal theme, I would like to share this Sambal Kecap recipe. It can be eaten with various soups or bbq. This time we eat it with chicken on skewer or sate/satay.


Ingredients:
8 chili paddy (add to your level of spiciness), chopped
2 cloves of shallot, chopped
2 cloves of garlic, chopped
1 tomato, chopped
1 tsp of ground white pepper
1/2 cup of sweet soy sauce
1 jeruk limo (Citrus amblycarpa)

Directions:
Mix all the ingredients together in a small bowl, then at last drizzle the jeruk limo juice over.

Bianca's and Jordan's Mom Copyright © 2009 Designed by Ipietoon Blogger Template for Bie Blogger Template Vector by DaPino