Click! April 2009 - Spring/Autumn - Snack in a Sac

Wednesday, April 29, 2009


I feel like my blog is running from one event to another...and this time is Click! submission again. This month theme is Spring/Autumn, and since I am living in the Northern hemisphere, I guess I should pick Spring. And here is my entry:

IMG_4160

Spring is always associated with cleaning, means working out and healthier life style as well. Therefore, I would like to present a healthy snack, edamame and it comes in a beautiful bright sac with some leaf buds - the sign of spring - at the background. Happy Spring every one!

Onde Onde (Glutinous Rice Balls with MungBeans Filling)

Monday, April 27, 2009


April theme for "Masak Bareng Yuuk!!!" event is traditional snacks with rice or glutinous rice ingredients. Firstly I thought I would not be able to join the event, since I was quite busy lately and did not have enough time to specifically prepare for this event. While I went through my photos file and found this "Onde-Onde" snack, I was so happy thinking that I will be joining the MBY again. Luckily I have not posted it before. So here is my entry...Thank you Rita and Rurie for sharing the recipe (source: Yasaboga).

Onde3

Ingredients:
Skin:
- 250 grams glutinous rice flour
- 25 grams sago flour
- ¼ teaspoon salt
- 175 cc warm coconut milk from ½ coconut
- 100 grams white sesame seeds, rinsed, drained and dried

Filling:
- 200 grams skinned mung beans (I just used the whole mung beans with skin on)
- 50 cc water
- 150 grams sugar (I replaced it with sweet condensed milk)
- 1 pandan leaf or vanilla (I chosed vanilla essence)
- oil, for deep frying

Onde4

Directions:
Filling:
Soak mung beans for about 1 hour, steam until done and mash while still hot. Mix with water, sugar and vanilla, cook on low heat and stir constantly until the mixture can be shaped. Cool and make balls with a diameter of 1 ½ cm. Set aside

Skin:
Mix glutinous rice flour, sago flour and salt. Pour in warm coconut milk, a little at a time, kneading constantly until the dough can be shaped. Divide into 12 parts.

• To assemble:
Take 1 part of dough, shape into a ball and flatten to ½ cm thickness. Place 1 ball-shaped filling in the centre, close the dough around it and reshape into a ball
. Roll ball into sesame seeds, pressing slightly to ensure that the seeds sticks to the dough. Or dip ball quickly into water to dampen the surface before rolling into the sesame seeds. Heat oil over medium fire and deep-fry the rolls until golden brown and done. Drain. Enjoy it with your afternoon tea/coffee.


Indonesian Food Week - Sego Gandul

Sunday, April 26, 2009


This is a reposting of my previous post and my entry for Indonesian Food Week held by NCC organized by Siany.

Photobucket

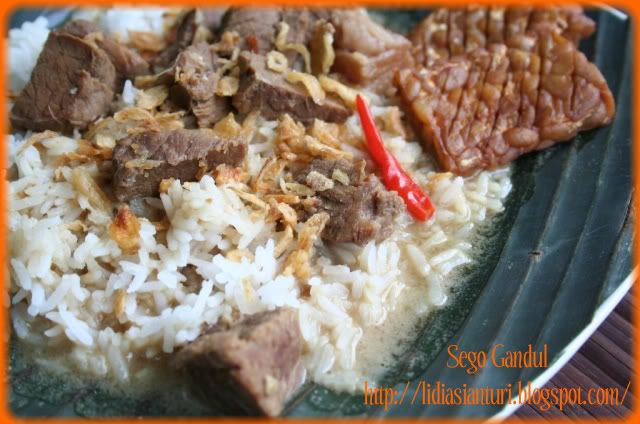
Sego Gandul or Nasi Gandul, literally means hanging rice...but do not expect that you will find the way it means by words. It is a traditional meal from Pati, Central Java. Somebody told me that because it is served with a piece of banana leaf lining the plate, it does not touch the plate, that's why they call it "Gandul", whereas "sego/nasi" means rice.
I was born in Pati, but I confess I had never made this meal before until the other day when I saw Titi and Ayin made and posted it on their blogs.
A year ago, my sister sent me the recipe through email and last week I went through my old inbox to find that particular message with the recipe in it, and I was happy to find it was still there. My sis got the recipe from a lady that lives in Pati, so I trust it is a genuine recipe.

Ingredients:
- 800gr of beef meat with a little fat (I do not like it too much fat)
- 4cloves of small red onion
- 8cloves of garlic
- 5 candle nuts
- 4cm of ginger
- 1tsp of shrimp paste
- 2tsp of ground coriander
- 1tsp of ground white pepper
- 1tsp of ground cummin
- 1tsp of ground kencur
- 4cm of galangal
- 4 lime leaves
- 1 cinnamon stick
- 10 of blanched chili paddy
- salt
- sweet soy sauce
- 1Tbsp of palm sugar
- 1/2 can of coconut milk
- oil for saute

Photobucket

Side dish:
- fried onion
- fried tempeh
- shrimp crackers (I did not serve it this time)

Directions:
Boil the beef with water until tender, keep the broth a side for later use, and cut the beef into small cubes. Crush onion, garlic, candle nuts, ginger and shrimp paste in a blender until smooth. Saute it with a little bit of oil for 2minutes. Add coriander, pepper, cummin, kencur, galangal and lime leaves and stir it well. Add the meat and stir it. Add blanched chili, cinnamon stick, salt, sweet soy sauce, broth and palm sugar. Cook and stir until boiling. Continue to cook for another 10-15min, until all the seasoning immersed. Discard the cinnamon stick and then add coconut milk. Cook until boiling again and turn off the stove.
To serve, line a plate with a piece of banana leaf. Place a scoop of warm steam rice and then pour Gandul over. Sprinkle some fried onion and add some fried tempeh at side. Originally instead of spoon, they used "suru"-a small long piece of banana leaf to eat (see the first picture).

Chipotle Croquette - My Experiment

Thursday, April 23, 2009

chipotle croquette

When it comes to food my hand is always itchy to try something new. One of those days I heard quite a lot of chipotle, and was curious enough to try it on my food. So I bought a bottle of chipotle mango seasoning. Tried it on steak, deliciousssooo...and this time, I tried it on croquettes. Good enough, not a big fan though...but at least healed my itchy hands! For those who love Mexican food, this would be superb!

Chipotle

Please follow this link for complete recipe. Just add some shakes of the chipotle mango seasoning when making ragout filing and potato skin.

chipotle croquette2

"Me Style" Thyme Seasoned Steak - etcetera

Wednesday, April 22, 2009

thyme steak2

There is always meat on my husband's plate. He will ask for it if there is none. He feels weak without it. And he is crazy of steak. What we have normally is Indonesian style, with coriander and sweet soy sauce as dominant flavor enhancer. This time (oh well...it was like 3months ago though...) I prepared it in a different way, it is more Western style.

Ingredients:
- whole chunk of steak meat (could be sirloin or tenderloin)
- olive oil
- dried thyme
- salt
- lime
- ground black pepper
- 4potato, cut into small chunk
- 200g of mushroom, cut into 4 each, washed

thyme steak

Directions:
Place the meat in a bake tray or aluminum pan, drizzle and rub on the lime. Then smear the olive oil all over the meat. Sprinkle some salt, black pepper and dried thyme. Let it stand for 15minutes. Then bake it at 350F until done (You may add some water during baking, so the meat won't get too dry). For the potato and mushroom, just add olive oil, salt, black pepper and thyme and then mix it well and bake it at 350F until done. Slice the meat and serve it hot with the potato and mushroom. Add some salad and/or hot sauce as you wish.

Garden Salad - Our (Almost) Every Day Ritual

Sunday, April 5, 2009

garden salad3

I believe that every body has their own ritual through every day of their lives. Starting from turning off the alarm clock and getting back to sleep in the morning, reading newspaper and sipping a cup of coffee, eating lunch in front of an office computer, jogging to home while going back from work, enjoying very sweet dessert after dinner, and finishing the day with putting on a fresh washed pajama and saying a little prayer before going to bed. No no..I am not talking about my habit though... For us, consuming salad with our meal is a ritual. This one is our typical salad, we do love it so much. Just call it garden salad.

Ingredients:
- bunch of any greenies, could be romaine lettuce, any lettuces, spinach
- bunch of baby carrots
- 1 big tomato, washed and cut or cherry tomato
- celery, washed and cut
- any dressing, we love ranch, italian or thousand island
- bacon bits (optional)

garden salad4

Directions:
Toss all of the veggies in a salad bowl. Pour some salad dressing and sprinkle the bacon bits. Mix it well. Serve it immediately.

And today is my daughter's birthday. Happy 2nd Birthday Bianca, mommy, daddy n Jordan loves you!

Two Layer Mango Pudding

Friday, April 3, 2009

mango pudding3

Who does not love mango? If you said you don't, you will be the first one I know. Well at least, as long as I live, I have never met someone who hates mango. My almost 2y old daughter loves it, my husband loves it and so do I. Back in my country, where you may find lots of Mango variety, you can choose of what your favorite, but in Canada, I have to be content of what the market has to offer. Even the canned one taste good! This time, I feel like combining the canned mango with agar. It's superb for dessert!

Ingredients:
- 1 package of red color agar powder
- 1 package of clear color agar powder
- 5 egg white
- 1lt of fresh milk
- 400ml cold water
- 18Tbsp of sugar
- 1 can of mango
- 1 small package of blackberries

mango pudding2

Directions:
In a pot, pour 500ml milk and 200ml water, mix it. Then add the clear color agar powder and stir it well until the agar distribute evenly. Place the pot on a stove and cook until boiling, do not forget to stir it while cooking. Once it is boiling, add 9Tbsp sugar and stir it well until all sugar dissolved.
Meanwhile place sliced mango on the bottom of round cake tin or pudding mold. Beat the egg white with a mixer at high speed until foamy. Pour the boiling agar into it and beat again at lowest speed for 1min or gently stir it with a wooden spoon. Pour it into the mold. Keep it in a freezer for 10minutes just enough time to let it just harden.
While waiting, prepare the top layer by well mixing the rest of milk and water with the red color agar powder. Bring it to boil and then add the remaining sugar, stir it well until all sugar dissolved. Remove it from the stove and wait for 2minutes (do not give time for agar to harden). Take out the harden first layer foamy agar from the freezer and carefully pour the red agar on top of it. Put it back to the freezer or fridge until it is harden (remember that using freezer is a way to accelerate the hardening process, but at the end it is better to keep it in a fridge). You may add some blackberries when serving.

Raisin Cake - My Baking Adventure - Failure Series!

Thursday, April 2, 2009

raisin cake

This happened when you were not patient enough to mix well the melted butter into the batter. I was so careless and just gave one-two strokes when mixing it. It was right after new year, and resolution did not give it any better! You can see the result, some butter "float" in the bottom of the cake mould (see the different color around the raisins, yup that is butter).
Second failure: some pores appeared...you are not supposed to be there "ugly" holes....your place is on ehmmm... Sponge Bob!
But still, the taste is yummy and still be my fave.
You can find the recipe here.

And today is Daddy's big day...Happy birthday Daddy! You absolutely are loved!

raisin cake2

PS: more failures coming up!

Bianca's and Jordan's Mom Copyright © 2009 Designed by Ipietoon Blogger Template for Bie Blogger Template Vector by DaPino