Pecel Lele (Deep Fried Cat Fish with Chili Paste) - IDFB Challenge #1

Thursday, September 29, 2011


Sambal u/ Pecel Lele

I have joined a group called Indonesian Foodblogger on Facebook, and every two months they have a challenge that every member can participate and there are prizes to win too! For the very first challenge, they present "Food by Its Country", and here is my entry..


This food reminds me much of my university life in Yogyakarta, where a lot of food hawkers sell this menu around Gadjah Mada University campus. And for sure, this was my favorite menu as a student before and yet today. Here is my version:

Ingredients:
- frozen cat fish, cut or whole, cleaned (available at Asian stores)
- 4 cloves of garlic, crushed
- 1Tbsp of ground coriander
- salt
- water
- oil for frying

To make sambal/chili paste:
- 4 cloves of garlic
- 4 cloves of shallot
- 1 big red chilly
- 12 chili paddy
- 1 tomato
- 1tsp of shrimp paste, toasted
- 1Tbsp of palm sugar
- salt
- kaffir lime (jeruk limau)
- used frying oil (the remaining after frying the fish)

Bahan2 Sambal

Directions:
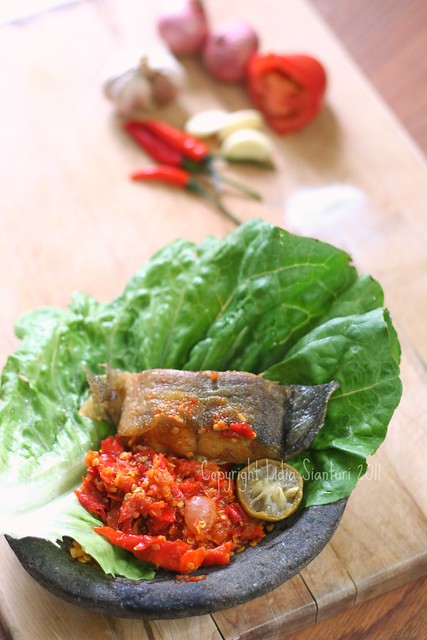
Since I normally bought the fish which was cleaned, I do not need to clean it myself. Make some slits on the side of the body. Mix crushed garlic, coriander, salt and water to marinate the fish in a container. Then marinate the fish in it for at least 30min. Deep fry it in hot oil under medium high heat until brown and crunchy. Drain off the excessed oil with paper towel.
To make chili paste: fry garlic, shallot, chili and tomato for 2-3minutes. Then transfer it into a grinder, I like to use "cobek" (traditional stone grinder). Add shrimp paste, salt and palm sugar and then grind until coarse smooth. Sprinkle some kaffir lime juice over.
Serve with warm steamed rice and some fresh veggies (lettuce, cucumber, cabbage, tomato, long beans, etc). You may add some sweet soy sauce into the chili paste to reduce the spiciness.


Black and White Wednesday - Week#12 - How hot can you go?

Wednesday, September 28, 2011

Tabasco


As some of you may know, my husband love to eat spicy/hot food. So I always have chili paste at home. When dine out he does not forget to ask for some hot sauce. This was one of them..and for him the spiciness is nothing, he emptied the first bottle right away after the waitress handed it to him. Sharing this beauty to BWW event. Check this out to join the fun.

Rose Green Tea Cupcakes

Monday, September 26, 2011

Rose Cupcakes

Lately, I prefer to cook or bake something for my friend's birthday or special event, rather than buying gift. Not that it is cheaper, it can be more costly, I feel that my hard work represents my love and caring for them. Just couple days before Jordan's birthday, my dear girlfriend had a birthday too. Thus I decided to bake some cupcakes for her. Since she is not a big fan of sweet, I prepared green tea flavored ones.
So the base is green tea cupcake, I was using the famous Hummingbird Red Velvet Cupcakes recipe and modify it with the addition of green tea and a drop of green food coloring, instead of cocoa and red food coloring.

Rose cupcakes

Ingredients for cupcakes:
60g unsalted butter, at room temperature
150g caster sugar (reduced to 125g)
1 egg
10g green tea powder
1 drop of green food coloring
1/2 tsp vanilla extract
120ml buttermilk
150g all purpose flour
1/2 tsp salt
1/2 tsp bicarbonate of soda
1.5 tsp white wine vinegar (I used regular vinegar)

For decoration:
1/2cup ready to use vanilla whipped cream
rolled fondant and gel food coloring
edible silver beads

Rose cupcakes

Directions:
Preheat the oven to 325F. Beat the butter and sugar on medium speed until light and fluffy. Speed up the mixer and add the egg. Continue to beat until it is well incorporated. In a separate bowl, mix well green tea powder, green food coloring and vanilla extract to make a thick paste. Add this to the butter mixture and mix well. Scrape down the side of the bowl. Lower the speed and slowly add half of the buttermilk. Mix well, then add half of the flour. Mix well until it is incorporated. Repeat this process until all the buttermilk and flour are added. Scrape down the side of the bowl again. Turn up to the high speed and beat until smooth and even. Lower the speed and add salt, bicarbonate of soda and vinegar. Beat it again until well mixed, then turn up the speed again and beat for a couple more minutes. Spoon the mixture into the cupcake pan until two-thirds full and bake for 20-25mins. Cool them off.
Spread the ready-to-use vanilla whipped cream and let them sit on the counter for an hour or so until it is set. Continue to decorate using fondant and silver beads.

IMG_0936

Since I got some cupcakes left, I packed two of them and gave them to Bianca's teachers.
Tutorials on how to make the rose and leave will be posted soon.

Rabbit Theme Bento - My Very First Bento

Sunday, September 25, 2011

Bento Day#1

I've promised myself long before that when my kids go to school, I will make them bento-s. So as Bianca started her school 2 weeks ago, I started to prepare bento for her. And since she is only at school for 3hours, I only get to prepare snack box for her.
This was my very first bento. As you can guess, it consists of "rabbit" hard boiled egg with nori eyes, nose and mouth; oyster sauce glazed steamed broccoli, baby carrot and "flower" cheddar cheese. I was using Hello Kitty round snack container and rainbow plastic baran.

Rabbit egg mould

Here is the picture of the egg mould.

Puppy Theme Birthday Cake

Saturday, September 24, 2011

Puppy theme Cake

I made this cute cake last month for my friend's daughter's birthday. This post mainly shares pictures of the cake and some useful links to make the fondant puppy. Sorry as no recipe will be shared. The base is chocolate sponge cake and all the decoration made out of fondant (except for the ribbon). I decided to prepare 4 different kinds of puppy.

puppy1

Top left: I made this using a toy model (Bianca has Barbie doll carrying this puppy - Barbie A Fashion fairy tale).
Top right: Please follow this and this link for tutorial on how to make this puppy.
Bottom left: I had posted a tutorial on how to make it here. Originally I saw a picture with this puppy here and from there using my imagination to create this poodle puppy.
Bottom right: I made this puppy with the help of tutorial/pictures on flickr, somehow I could not find the link. Will be updated as soon as I found it.

puppy2

Those are pictures of how they look after I placed them on the cake. I also placed a bowl and 2 bones in the middle of the cake.

puppy3

The side of the cake was decorated with some paw prints, the birthday girl's name, a heart with the number of the age. Not to forget the ribbon to sweeten the cake.

Laksa Ayam (Chicken Laksa)

Friday, September 23, 2011

Laksa Ayam


It has been a while I have not posted any meal recipes, seems like I am shifting to snack and cake decorating all these while. Nah..I still cooking as I have to feed my family (in case you're wondering). So today I decided to share a meal recipe for you. This soup is good to serve during cold days, as we are approaching autumn.

Ingredients:
4 whole chicken legs
1.5L water
1 stalk of lemongrass, cut into 4, bruised
4cm of galanga, bruised
3 kaffir lime leaves
1 Tbsp chicken broth powder
1 can of coconut milk
oil for sauteing

To crush into puree:
8 cloves of shallot
6 cloves of garlic
6 candlenuts, grilled
1 tsp dried small shrimp (ebi)
1.5 tsp coriander
1 tsp white pepper
3cm of turmeric or 1tsp of ground turmeric
3cm of ginger
salt
granulated sugar

Side dishes:
Vermicelli, boiled and drained
Bean sprout, boiled and drained
Shrimp, salted, half-boiled
Fried shallot and garlic
Egg, boiled (optional)

Laksa Ayam

Directions:
Boil chicken for 30min. Saute the spice puree, lemongrass, lime leaves, galanga with oil until fragrant. Then add this to the pot with the boiled chicken in it. Continue to cook for another 15min. Take out and drain off the chicken, then shred the meat. Keep it aside. Add the coconut milk and chicken broth powder into the broth left in the pot. Re-boil and adjust the taste. Serve it in a bowl together with the side dishes.

Bianca's and Jordan's Mom Copyright © 2009 Designed by Ipietoon Blogger Template for Bie Blogger Template Vector by DaPino